
Published On: 21 August 2026
Yes, many reusable false eyelashes can be cleaned and worn again, but the safest method depends on the lash type, material, adhesive system, and the manufacturer’s care instructions.
Strip lashes, reusable clusters, pre-bonded styles, and specialty lash systems may not tolerate the same soaking, cleanser, or removal method.
To protect both the false lashes and your natural lash line, clean them gently, remove old glue and makeup buildup carefully, and avoid harsh chemicals or unnecessary scrubbing.
This guide explains how to remove false eyelashes safely, clean adhesive and mascara residue, rinse and dry them correctly, store them for future use, avoid common cleaning mistakes, and recognize when a worn pair should be replaced instead of reused again for another application.
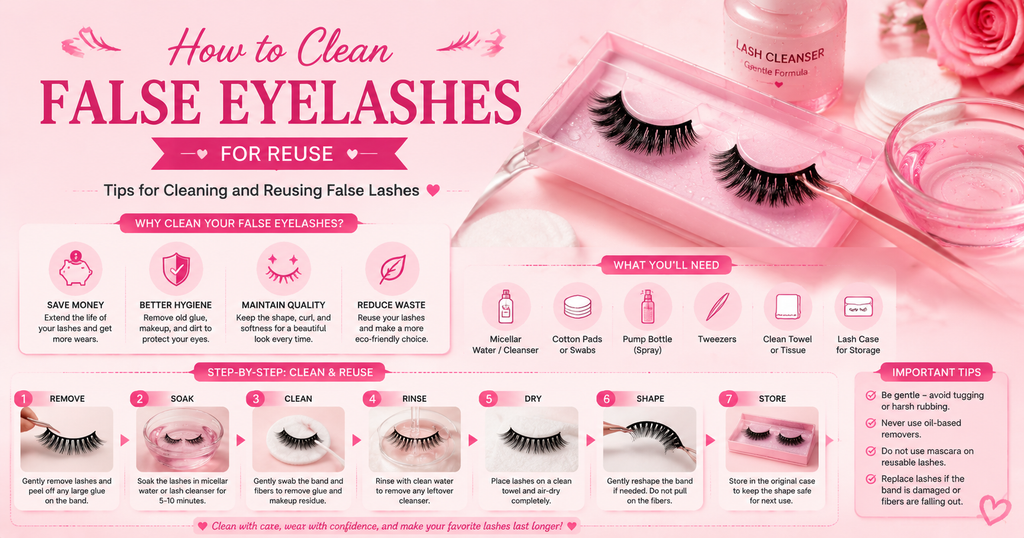
Why You Should Clean False Eyelashes Before Reusing Them
1. Save Money
Cleaning reusable false eyelashes can help you lower their cost per wear by keeping a usable pair in rotation instead of replacing it after every application.
Several lash-care guides agree that careful cleaning, gentle removal, and proper storage can extend the usable life of false lashes, allowing the original purchase cost to be spread across multiple wears.
This can make a noticeable difference if you wear falsies regularly or prefer higher-priced styles, since frequent replacement costs can add up over time.
However, the number of times you can safely reuse a pair varies by lash construction, condition, and the manufacturer’s reuse instructions, so saving money should never mean continuing to wear damaged lashes.
2. Support Better Hygiene
Cleaning reusable false eyelashes helps you avoid placing old adhesive, mascara, oils, skin debris, and other residue back along the lash line each time you wear them.
This matters because eye-area cosmetics are repeatedly exposed to hands, skin, applicators, and the surrounding environment, creating opportunities for microbial contamination; the FDA therefore recommends clean hands and tools, warns against sharing eye cosmetics, and advises stopping eye-cosmetic use when an eye infection is present.
Research on used eye cosmetics also confirms that microbial contamination can occur during normal consumer use, reinforcing the value of keeping reusable products that return close to the eye as clean as practical.
Cleaning your false lashes after wear therefore supports better hygiene by removing accumulated residue before the next application, but remember that home cleaning does not make a used lash sterile or guarantee protection from infection.
3. Maintain Lash Shape and Quality
Cleaning false eyelashes carefully helps preserve the curve of the lash band, the alignment of the fibers, and the soft, separated appearance of the lash style between wears.
Dried adhesive can build up along the band, while mascara and other makeup can coat the fibers, leaving them stiff, clumped, or harder to position naturally on your lash line.
Removing this buildup gently allows the band and fibers to retain more of their intended flexibility and shape, but aggressive rubbing, squeezing, or pulling can bend the band or disturb the lash pattern.
After cleaning, let the lashes air-dry, lightly restore their original arrangement if needed, and return them to their shaped case; keeping the strip in its original curved position helps prevent it from becoming flattened or misshapen before your next application.
4. Reduce Waste
Cleaning and reusing false eyelashes can help reduce beauty waste by keeping a reusable pair in use for more than a single application instead of discarding it prematurely.
Several lash-care guides make this same connection between proper care, repeat wear, and avoiding unnecessary disposal, while One Fab Day specifically notes that reusing falsies can make sense from an environmental perspective as well as a practical one.
The broader waste-management principle is also well established: the U.S. Environmental Protection Agency prioritizes source reduction and reuse because extending the useful life of products can reduce the amount of material entering the waste stream.
For false lashes, that means fewer usable lash pairs—and potentially less associated packaging—need to be discarded and replaced as often. However, reuse should stop once the lashes are damaged, contaminated, or no longer suitable for safe wear.
Before You Clean False Eyelashes, Check the Lash Type and Care Instructions
Check Whether You Have Strip Lashes, Clusters, or Another Reusable Lash Type
Before cleaning, identify what type of false eyelashes you are actually handling, because the construction and attachment system determine where residue collects and how carefully the lashes need to be treated.
A strip lash has one continuous band that sits across the lash line, while clusters or segments consist of smaller groups with individual bases.
Correctly identifying your lashes first helps you avoid using a cleaning technique that could deform the band, disturb the fibers, or damage a specialized attachment system.
Professional lash extensions should not be treated as removable reusable falsies, since their removal and aftercare are different from strip or removable cluster lashes.
Read the Manufacturer’s Cleaning and Reuse Instructions
Before you clean a reusable pair, check the package directions or the lash manufacturer’s official care instructions, because cleaning methods are not interchangeable across every false-lash system.
Manufacturer guidance can specify which cleanser to use, whether the lashes may be washed or soaked, how adhesive residue should be removed, and how the lashes should be dried and stored for another wear.
If your lashes come with no usable care instructions, choose the gentlest compatible cleaning method and avoid experimenting with harsh solvents.
Wash and Dry Your Hands Before Handling the Lashes
Wash your hands thoroughly with soap and water, rinse away the soap completely, and dry them with a clean towel before removing, cleaning, or handling reusable false eyelashes.
This small step matters because microorganisms present on your hands can be transferred to products and surfaces used around the eyes; the FDA specifically advises washing your hands before handling eye cosmetics for this reason.
Once your hands are clean and completely dry, handle the lashes carefully rather than repeatedly touching them with unwashed fingers, which can reintroduce oils, dirt, and microorganisms before the cleaning process even begins.
A Guide to Clean and Reuse False Eyelashes Step by Step
Gently Remove the False Eyelashes
1. Soften the Glue
Soften the lash adhesive before you begin peeling so the bond releases with less resistance. Apply an eye-area remover that is compatible with your particular lash adhesive to a cotton pad or swab, then hold or apply it along the bonded area for the amount of time specified by the product.
The lash should begin releasing easily once the adhesive has softened; if it still feels firmly attached, apply a more compatible remover and give the bond additional time instead of pulling harder.
Always follow your lash and adhesive manufacturer’s directions if they specify a particular remover or removal time to remove false eyelashes.
2. Slide the Lash Off—Don’t Rip or Pull
Once the adhesive has softened, ease the false lash away slowly rather than ripping it from the eyelid or natural lashes.
For a strip lash, hold the band—not the lash fibers—and gradually peel it away with controlled pressure; for removable clusters, loosen and remove the segments individually so one stubborn section does not place tension on the surrounding lashes.
A common mistake is continuing to tug when the band stops moving; instead, stop at the resistant area, soften the remaining adhesive again, and continue only when the lash releases without force.
3. Use a Lash Removal Tool if Needed
A dedicated lash-removal applicator or remover tool can give you more control when fingers alone cannot release a small cluster or bonded section, but the tool should assist an already-softened bond rather than be used to pull the lash free by force.
Apply the compatible remover first, wait for the adhesive to loosen, and then use the tool according to the manufacturer’s directions while gripping the false-lash base instead of the natural lash hairs.
Avoid improvising with sharp or poorly controlled tools around the eye; Greatist specifically cautions against yanking false lashes off with tweezers because this can damage the lashes and put the eye area at unnecessary risk.
4. Avoid Pulling on Your Natural Lashes
Keep the removal force on the false-lash band or cluster base rather than your natural eyelashes. Pulling bonded falsies while the adhesive is still gripping your natural lashes can mechanically tug those hairs out instead of allowing the artificial lash to separate cleanly.
This is more than a cosmetic concern: ophthalmology literature recognizes traction from artificial lashes as a mechanism that can contribute to natural eyelash loss when sufficient pulling force is repeatedly applied.
To reduce that traction, support the lash line, work slowly, and immediately stop if you feel your natural lashes moving or being pulled with the falsies; soften the adhesive again before continuing.
If removal causes persistent eye pain, marked redness, swelling, or another significant eye symptom, stop the process and seek appropriate eye-care advice.
Gently Remove Excess Glue From the Lash Band
1. Removing Glue From False Eyelash Strips
For strip lashes, hold the lash band close to the area you are cleaning and gently lift an edge of the dried adhesive with clean fingertips or blunt-tipped tweezers.
Once the glue begins to separate, peel it gradually along the direction of the band rather than pulling sharply away from it.
A common mistake is grabbing a large glue patch and tugging until it comes free; that extra force can stretch or bend a flexible band, so stop if the band itself begins moving with the adhesive.
2. Removing Glue From Reusable Cluster Lashes
Reusable cluster lashes require more precision because each segment has a much smaller base, giving you less material to hold while removing adhesive.
Place the cluster on a clean surface and, if its reuse instructions allow it, soften stubborn bond residue with the manufacturer-recommended remover before wiping the residue away from the base with a cotton swab.
Avoid aggressively scraping a tiny cluster base with tweezers just because the adhesive remains visible; if the bond does not release easily, another short application of the compatible remover is safer for the reusable lash than increasing mechanical force.
3. Avoid Pulling or Pinching the Lash Fibers
Keep your fingers or tweezers on the band or cluster base, not on the decorative lash fibers, while removing adhesive.
Pulling the fibers to create leverage can loosen their attachment, bend their arrangement, or pull individual hairs away from the base.
If you accidentally grip the fibers, release them and reposition your hold at the base before continuing.
4. Work From the Lash Band Rather Than the Lash Tips
Treat the lash band as your working surface when removing old adhesive because that is where strip-lash glue is applied and where most dried buildup remains after wear.
Support the band close to the glue, lift the residue in small sections, and move gradually across the strip instead of holding the long lash tips and pulling from a distance.
Keeping your hands close to the band gives you better control over the removal force and reduces unnecessary bending or tension through the lash fibers.
Remove Makeup and Mascara Buildup From the False Eyelashes
1. Prepare a Suitable Cleaning Solution
Choose a cleanser that is appropriate for your particular false lashes and intended for cosmetic or eye-area use, rather than assuming one homemade solution works for every lash type.
Micellar water and compatible eye-makeup removers are commonly recommended for reusable synthetic strip lashes because they can lift mascara and other cosmetic residue without requiring heavy scrubbing.
Avoid experimenting with harsh household cleaners around reusable eye cosmetics; the FDA advises using products around the eyes only when they are intended for that area because eyelid tissue is particularly delicate.
2. Decide Whether the Lashes Can Be Soaked
Do not automatically submerge every pair of false eyelashes. Some reusable synthetic strip lashes are designed to tolerate washing or soaking, and certain brand-specific cleansers even instruct users to immerse the lashes for a defined period.
However, other lash constructions can lose their curl, shape, or fiber arrangement when saturated.
Check the manufacturer’s directions first, and if soaking is permitted, use only the recommended solution and duration instead of leaving the lashes submerged longer in the hope of making them cleaner.
If the product instructions are unclear, controlled wiping is the more conservative option because it limits unnecessary liquid exposure.
3. Use a Wiping Method When Soaking Is Not Suitable
When the lash material should not be submerged, place the lash on a clean, flat surface and use a cotton swab, reusable swab, or other manufacturer-approved applicator lightly moistened with the compatible cleanser.
Work across small sections rather than saturating the entire lash, allowing the cleanser to loosen makeup before you wipe it away.
The common mistake is trying to compensate for stubborn makeup by rubbing harder; instead, apply a little more compatible cleanser and repeat gentle passes so the residue softens gradually.
4. Wipe Down the Lash Band and Fibers Carefully
Clean the lash band and lash fibers separately and with controlled strokes.
Use a dampened swab to work along the band where eyeliner, adhesive traces, oils, and makeup tend to collect, then move through the fibers from the base toward the tips so you follow their existing direction instead of pushing them sideways or backward.
Support the band while you clean and use repeated light passes instead of squeezing, twisting, or scrubbing the fibers; if residue cannot be removed without deforming the lash, stop rather than damaging the pair simply to make it look completely clean.
Disinfect False Eyelashes Only When the Product Instructions Support It
1. Rubbing Alcohol Method: Use Only When It Is Compatible With the Lashes
If your lash manufacturer specifically permits rubbing alcohol, remove the lashes from your eyes first and apply only the amount and concentration directed by the product instructions, keeping the alcohol completely away from your eyes.
Alcohol has genuine antimicrobial activity—CDC guidance documents bactericidal and virucidal effects for appropriately concentrated ethyl and isopropyl alcohol—but that evidence comes from controlled disinfection applications and does not establish a universal false-eyelash protocol.
Isopropyl alcohol can also irritate the eyes, which is another reason not to improvise with it around the lash line. If the lash brand gives no alcohol-cleaning instructions, use its recommended eye-area cleanser instead of assuming that a stronger disinfectant will produce a safer result.
2. Tea Tree Oil or Lash Cleanser: Do Not Treat Them as Interchangeable
Use a dedicated lash or eye-area cleanser according to its label rather than substituting concentrated tea tree oil simply because tea tree oil has antimicrobial properties.
Tea tree oil is not automatically harmless near the ocular surface: a published case report documented corneal epithelial injury following topical tea tree oil exposure, and newer laboratory research has found concentration-dependent toxic effects on human corneal cells.
This does not mean every properly formulated eye-area product containing a tea-tree-derived ingredient is unsafe; formulation and concentration matter.
However, undiluted or homemade tea tree oil mixtures should not be treated as equivalent to a cleanser specifically formulated and labeled for use around the eyes, consistent with the FDA’s advice to use only appropriately intended products in this sensitive area.
3. Avoid Leaving False Lashes in Alcohol for Extended Periods
Even when alcohol is approved for a particular reusable lash, do not extend the exposure time beyond the manufacturer’s directions in an attempt to achieve “extra” disinfection.
Disinfectants work according to specific concentration and contact conditions, and longer exposure should not be assumed to provide proportionally better protection; CDC guidance also emphasizes using disinfecting chemicals in ways that are compatible with the material or device being treated.
Apply the approved method for the stated duration, then allow the lashes to dry fully before they are stored or brought back near the eyes. If the instructions call for wiping or misting rather than soaking, do not convert that direction into a prolonged alcohol bath.
4. Clean One Lash at a Time for Better Control
Handle one strip or one reusable cluster at a time when performing a product-approved disinfecting step so you can support the lash band, control where the liquid is applied, and avoid unnecessarily saturating the fibers.
Place the lash on a clean surface, work systematically across the band or base, and check that you have treated the intended areas without repeatedly rubbing or squeezing the lash.
Keeping each lash separate also makes it easier to notice residue that still needs ordinary cleaning before you move on, because disinfectant should not be used as a substitute for physically removing visible makeup and adhesive.
Once the approved treatment is complete, place the lash on a clean surface and let it dry as directed before handling the next stage of care.
Rinse the False Eyelashes When the Cleaning Method Requires It
1. Remove Remaining Cleanser or Loosened Residue
When rinsing is required, use a gentle flow or small amount of clean lukewarm water to carry away loosened makeup and remaining cleanser from the lash band and fibers.
Support the lash at the band and rinse until obvious soap or cleaning residue is gone, without rubbing the fibers together or repeatedly squeezing them.
The purpose of this step is simply to remove what the preceding cleaning process has already loosened—not to scrub the lashes a second time.
After rinsing, inspect the band for visible residue and use another gentle cleaning pass if necessary rather than trying to scrape stubborn material from a wet lash.
2. Avoid Excessive Handling While the Lashes Are Wet
Handle wet false eyelashes as little as possible because pulling, twisting, squeezing, or brushing them aggressively can disturb the band and fiber arrangement you are trying to preserve.
After rinsing, lift the lash by its band, place it on a clean surface, and let excess water drain before moving to the drying step. Do not wring the lashes, rub them between your fingers, or repeatedly reshape the fibers while they are saturated.
A gentle wash, rinse, and air-dry approach is also consistent with manufacturer care instructions for reusable strip lashes.
Dry the False Eyelashes Completely
1. Place Them on a Clean, Dry Surface
Set each lash on a clean, dry, lint-free surface, such as a fresh paper towel, with the band resting naturally instead of folding or pressing the lash flat. If excess water is visible, gently touch the moisture with a lint-free material rather than rubbing across the fibers.
Keep the lashes separated and positioned in their normal curve so the fibers are not tangled or compressed while they dry. This controlled placement also makes it easier to leave the lashes undisturbed until the moisture has evaporated.
2. Let the Lashes Air-Dry Completely
Allow the lashes to air-dry naturally until both the fibers and lash band feel completely dry before moving on to storage.
Do not try to speed the process by squeezing the lashes or repeatedly handling them; simply leave them in their natural shape and give the moisture time to evaporate.
Manufacturer care instructions for reusable strip lashes likewise recommend allowing cleaned lashes to air-dry after washing and rinsing.
Once the lashes are fully dry, they are ready for reshaping if necessary and proper storage.
3. Reshape the Lash Curve While Drying if Needed
If a reusable strip lash looks slightly flattened or uneven after cleaning, gently guide the band back toward its natural curve while it is still slightly damp. Hold the band rather than the lash tips, use your fingertips or a clean spoolie to separate any displaced fibers, and avoid sharply bending or stretching the strip in an attempt to restore its shape.
Once the lash looks properly aligned, place it back on its curved original tray or another clean surface that supports its normal shape and allow it to finish air-drying without further handling.
This approach is consistent with manufacturer care instructions that recommend returning cleaned reusable lashes to their original tray to air-dry and help maintain their curl and shape.
The goal is to restore only minor distortion; if the band remains permanently kinked, stretched, or misshapen, repeatedly forcing it back into position can cause more damage than it fixes.
4. Do Not Store the Lashes While They Are Damp
Wait until the lash band and fibers are completely dry before closing them inside a case or other storage container.
Putting damp lashes away skips an important part of the care process and can leave the fibers clumped or the band resting in an unwanted position as it finishes drying.
Instead, leave the cleaned lashes exposed on their clean drying surface or original tray until no moisture remains, then move them into storage. Reusable strip-lash care instructions likewise place air-drying before the lashes are considered ready for another wear.
A common mistake is storing lashes as soon as they look dry on the surface, so check the band as well as the visible fibers before putting the pair away.
Store the False Lashes Properly for Future Use
1. Use the Original Lash Case
The original lash case or molded tray is usually the best storage option because it was designed to hold the lashes in the shape in which they were supplied.
Place each fully dry strip back along the curved section of the tray, arranging the fibers gently so they are not caught under the lid or pressed against each other.
Official reusable-lash care instructions specifically recommend returning cleaned lashes to their tray or original packaging, helping preserve their arrangement until the next wear.
A common mistake is throwing the original tray away after the first application; keeping it gives you a simple protective holder that supports the lash band instead of allowing the strip to become flattened or tangled.
2. Use a Clean Small Container if the Original Case Is Unavailable
If you no longer have the original packaging, use a clean, dry container that is large enough to hold the lashes without folding, compressing, or bending them.
Arrange strip lashes in a gentle curve inside the container, while smaller reusable clusters can be kept separated so their fibers do not become tangled or crushed together.
Choose a container that closes securely enough to protect the lashes from dust and loose items in your makeup bag, but make sure the lashes are fully dry before closing it.
The most common mistake is choosing a container that is too small and forcing the lashes inside; if the band has to be sharply bent to fit, use a larger container instead.
3. Keep the Lashes Dry and Away From Excess Heat or Moisture
Store reusable false eyelashes in a clean, dry place at a stable room temperature once they are completely dry. Avoid leaving the lash case in a steamy bathroom, damp makeup bag, hot car, near a radiator, or anywhere exposed to repeated temperature extremes.
The FDA classifies false eyelashes as eye-area cosmetics and advises keeping cosmetic products clean and protecting them from temperature extremes during storage.
A dry, protected location also helps the lash band and fibers remain in the shape you restored during cleaning rather than being exposed unnecessarily to moisture or heat before the next wear.
4. Label the Container if You Store Multiple Lash Pairs
If you keep several reusable lash pairs, label each container with the lash style, type, or another identifier so you can return each pair to the correct case after cleaning.
This is especially helpful when different lashes require different cleaning products, soaking methods, or manufacturer care instructions.
You can also note the date you opened the pair or began reusing it if that helps you keep track of its condition, but do not rely on a use count alone to decide whether a lash is still suitable to wear.
Most importantly, keep each reusable pair for your own personal use rather than mixing or sharing used eye-area cosmetics; the FDA specifically advises against sharing eye cosmetics because contamination can be transferred between users.
5. Protect the Lash Band and Fibers From Crushing
Store false lashes where the band can maintain its natural curve and the fibers are not pressed, folded, or trapped under other products. Position strip lashes along the curved section of their tray when possible, and make sure the lid closes without catching the lash tips.
If you use a separate container, choose one that is firm and large enough to protect the entire pair rather than squeezing the lashes into a small compartment.
A common mistake is dropping loose falsies into a crowded makeup bag, where pressure from compacts, brushes, or other items can bend the band and flatten or misalign the fibers.
Keeping them inside a properly sized protective case helps preserve their physical shape until the next application.
Common Mistakes to Avoid When Cleaning and Reusing False Lashes
1. Don’t Use Harsh or Unapproved Chemicals
Do not clean reusable false eyelashes with bleach, household disinfectants, strong solvents, or other chemicals that are not intended for the lashes or eye area. A chemical may be effective at cleaning another surface without being appropriate for a cosmetic product that will later sit close to your eyes.
The FDA notes that false eyelashes are eye-area cosmetics and that the eyelids are delicate, making irritation or injury around this area particularly troublesome.
Use the cleanser or remover recommended for your particular lashes, or a gentle eye-makeup remover when the manufacturer allows it. Official reusable-lash care instructions commonly specify gentle washing or gentle eye-makeup removal rather than household-strength cleaning chemicals.
If a product is not approved or recommended for your lash type, a stronger cleaning action is not a good reason to experiment with it.
2. Don’t Rub or Scrub the Lashes Vigorously
Avoid scrubbing false eyelashes back and forth when makeup or adhesive residue is difficult to remove. Instead, support the lash at the band and use light wiping or swabbing motions, allowing a compatible cleanser to soften the buildup before repeating the pass.
Reusable-lash care instructions favor gentle washing or swabbing, and manufacturers also warn that pulling delicate lashes can break fibers or bend the band into an unusable shape. Pressing harder may remove residue faster, but it can also disturb the fiber pattern, flatten the curl, or distort the flexible band.
If a stubborn patch remains after gentle cleaning, soften it again rather than increasing the scrubbing force.
3. Don’t Soak the Lashes Overnight
Do not leave false eyelashes soaking overnight simply because the makeup or adhesive is stubborn.
Soaking time should follow the care instructions for your particular lash type, because some reusable strips are intended for a gentle wash and rinse, while other lashes are cleaned mainly by wiping with makeup remover.
Leaving lashes submerged far longer than the recommended cleaning process adds unnecessary liquid exposure and may leave delicate bands, fibers, or specialized components in conditions they were not designed to tolerate.
If residue remains after the recommended cleaning period, repeat a controlled cleaning pass or use the manufacturer-approved remover instead of extending the soak overnight.
4. Don’t Assume Every False Lash Can Be Soaked
Do not assume that every reusable false eyelash type can be submerged in water or cleaning solution. Lash construction varies, and the safest cleaning method depends on the band, fibers, attachment system, and manufacturer’s care instructions.
Some reusable strip lashes are specifically designed for gentle washing in warm water and soap, while other manufacturers direct users to clean the band and fibers by wiping them with a gentle eye-makeup remover instead.
Soaking a lash that was designed for controlled wiping exposes the entire band and fibers to unnecessary liquid and may affect its shape or construction.
Check the care directions first; if immersion is not specifically supported, use a controlled wiping method rather than experimenting with a prolonged soak.
5. Don’t Apply Fresh Glue Over Dirty Lash Bands
Remove old adhesive and visible makeup residue from the lash band before applying fresh glue for another wear.
Dried adhesive can form irregular patches along the strip, preventing the band from sitting as smoothly and evenly as a clean band during the next application. Reusable strip-lash instructions specifically direct users to remove used adhesive from the band before returning the lashes to their tray for reuse.
Hold the band securely and remove softened or dried glue with gentle, controlled pressure instead of simply covering the buildup with another layer of adhesive.
If residue is too firmly attached to remove without stretching, tearing, or deforming the band, continuing to add fresh glue is not a good substitute for proper cleaning.
6. Avoid Applying Mascara Directly to Reusable False Lashes When Possible
When your lash style allows it, apply mascara to your natural lashes before placing reusable strip lashes rather than repeatedly coating the false-lash fibers themselves.
Mascara adds another layer of cosmetic residue that must later be removed, and repeated product buildup can leave the fibers clumped or require more cleaning and handling between wears.
Keeping mascara off the reusable fibers therefore makes routine cleaning simpler and reduces the amount of rubbing or wiping needed to restore the lash pattern.
Some specialized reusable lash systems go further and specifically instruct users not to apply mascara before or after application, showing why product-specific directions should always take priority.
If you do apply mascara directly to a reusable strip lash, remove the buildup gently with a cleanser approved for that lash rather than scrubbing the fibers.
Read Here: can you apply mascara to false eyelashes
7. Don’t Share Used False Eyelashes
Keep reusable false eyelashes as a personal-use cosmetic rather than sharing a worn pair with someone else.
During wear and handling, the lashes can come into contact with your eyelid skin, natural lashes, fingers, makeup, and other eye-area products, so passing the same pair between people can also transfer microorganisms.
The FDA specifically advises consumers not to share eye cosmetics because another person’s germs may create a contamination risk.
Cleaning a used pair does not make sharing a good hygiene practice, because ordinary home cleaning should not be treated as sterilization.
If another person needs false lashes, use a separate new pair rather than trying to prepare your worn lashes for them.
8. Don’t Try to Clean False Eyelashes While Wearing Them
For removable reusable falsies, take the lashes off before performing a full cleaning rather than trying to wash the band and fibers while they are still attached to your eyelids.
Removing them first gives you controlled access to dried adhesive, mascara, and residue without directing cleanser, loosened debris, or unnecessary rubbing toward the eye.
Manufacturer care instructions for reusable strip lashes likewise place cleaning after the lashes have been removed, followed by washing, rinsing, and air-drying before reuse.
This approach also aligns with FDA guidance to use products around the eyes only as intended and to handle eye cosmetics carefully because the eyelid area is delicate.
If the lash line itself needs cleaning while you are wearing a product designed for extended wear, follow that specific lash system’s aftercare instructions rather than using the deep-cleaning method intended for removing reusable falsies.
9. Don’t Store Lashes Before They Are Completely Dry
Do not close freshly cleaned false eyelashes inside their case while the band or fibers are still damp.
Allow the pair to air-dry completely first, then return it to a clean protective container for storage; reusable strip-lash care instructions similarly place air-drying after washing and rinsing.
Keeping cosmetics in damp conditions is also poor storage practice because the FDA notes that some microorganisms can grow more readily under warm or damp storage conditions.
A common mistake is assuming the lashes are ready to store as soon as the visible fiber tips look dry, so check the thicker lash band as well before closing the case.
Signs It’s Time to Replace Your False Eyelashes
1. The Lash Band Has Lost Its Original Shape
Replace the lashes if the band has become permanently stretched, sharply kinked, twisted, torn, or unable to follow the natural curve of your eyelid.
A healthy reusable strip should remain flexible enough to sit smoothly along the lash line; when the band no longer holds its intended shape, adding more adhesive does not correct the underlying deformation.
Gentle reshaping can help with minor flattening after cleaning, but repeatedly bending a badly distorted band can weaken it further or leave the lashes sitting unevenly.
If the band still looks or feels misshapen after careful cleaning, drying, and gentle reshaping, retire the pair rather than forcing it through another application.
2. The Lash Fibers Are Thin, Frayed, Bent, or Missing
Look closely at the fiber pattern as well as the lash band when deciding whether a pair is still worth reusing.
Noticeable shedding, frayed fibers, permanent bends, flattened sections, or missing groups of hairs can change the intended shape and leave the lash looking uneven even after it has been cleaned and brushed back into place.
Do not pull, trim, or aggressively comb damaged fibers in an attempt to make the pair look new again, because that can remove additional hairs or disturb the remaining pattern.
If several fibers have permanently lost their arrangement and gentle reshaping no longer restores the style, replacing the lashes will usually give you a cleaner and more predictable application.
3. Makeup or Adhesive Buildup Cannot Be Removed Safely
Replace a pair when old glue, mascara, eyeliner, or other buildup remains embedded in the band or fibers after reasonable gentle cleaning.
Stubborn residue is not a reason to start scraping harder, soaking the lashes indefinitely, or experimenting with stronger solvents that the manufacturer has not approved.
Reusable lashes are intended to be maintained through appropriate cleaning and care, not through increasingly aggressive treatment that damages their construction.
Try another controlled pass with the compatible cleanser or adhesive remover first; if the remaining buildup can only be removed by stretching the band, pulling fibers, or using an unsuitable chemical, discard the pair instead.
4. The Lash Band Is Stretched, Torn, or Damaged
Replace reusable false eyelashes when the lash band is stretched, torn, split, sharply kinked, or no longer holds its original curve. The band is the structural base that carries the lash fibers and receives the adhesive, so once that base is physically damaged, cleaning alone cannot restore its original construction.
Reusable strip lashes are designed to be cleaned of old adhesive and returned to their tray for another wear, which depends on the band remaining intact enough to keep its intended shape.
Do not try to compensate for a torn or overstretched band by adding extra glue, trimming away damaged sections, or repeatedly bending it back into place.
If the band cannot sit smoothly along your lash line without being forced into position, retire the pair and use a new one.
5. The Lashes Were Used During an Eye Infection
Discard false eyelashes that you were wearing when an eye infection developed, even if the lashes still look clean after washing.
The FDA advises avoiding eye cosmetics while an infection or inflammation is present and specifically recommends discarding eye cosmetics that were being used when the infection occurred.
Do not rely on micellar water, soap, rubbing alcohol, or another home-cleaning method to make that same pair suitable for reuse, because routine cosmetic cleaning should not be treated as sterilization.
Wait until the infection or surrounding inflammation has resolved before using eye cosmetics again, and begin with a fresh pair of false lashes rather than reintroducing the pair worn during the infection.
6. You Experience Irritation or a Suspected Allergic Reaction
Stop wearing the false lashes if you develop itching, burning, persistent redness, eyelid swelling, rash, or other unusual irritation during or after application.
The FDA advises stopping an eye cosmetic immediately if it causes irritation, and documented cases show that ingredients in false-eyelash adhesives—including latex and cyanoacrylate-based glues—can trigger allergic contact reactions in some people.
Remove the lashes carefully rather than continuing to wear them through the reaction, and do not repeatedly reapply the same lash-and-adhesive combination just to see whether the symptoms return.
If irritation persists, worsens, or involves significant swelling or other eye symptoms, seek medical advice rather than trying another cosmetic product over the irritated area.
However, the adhesive rather than the reusable lash itself may sometimes be responsible for the reaction, so replacing the lashes alone does not necessarily remove the trigger.
Read Here: how to apply false eyelashes
7. You Have Reached the Manufacturer’s Recommended Reuse Limit
Use the reuse guidance provided for your particular false lashes rather than applying one universal wear count to every pair. Reuse limits vary substantially between products:
Some reusable strip lashes are marketed for around 5–6 wears, others for up to 10, and some premium styles for 15 or more wears when properly maintained.
If your manufacturer provides a recommended reuse range, treat it as a practical upper guide instead of continually cleaning and reapplying the pair beyond that point simply because it still looks acceptable.
Keep track of your wears if necessary, but inspect the band, fibers, and remaining buildup before every application because poor condition can make replacement necessary before the stated reuse limit is reached.
How Many Times Can You Reuse False Eyelashes
False eyelashes differ in band design, fiber construction, attachment system, and intended method of reuse, so a wear count that applies to one product may be inappropriate for another.
Even within reusable lashes, official product guidance ranges from pre-bonded clusters intended for only a small number of reuses to conventional strip lashes marketed for considerably more wear.
Care also changes the outcome: official lash guidance specifically links longer usable life with gentle handling, cleaning, and correct storage.
This is why “false lashes last X wears” should be treated as a product-specific estimate rather than a rule for every pair.
What Determines How Many Times False Eyelashes Can Be Reused
Lash construction and material:
Different lash systems are built differently, and those differences affect how they respond to repeated removal, cleaning, moisture, and reshaping.
Some manufacturers even give different water-care instructions for human-hair and synthetic-blend lashes, showing that material and construction can affect maintenance requirements.
Do not judge durability from labels such as “synthetic” or “natural” alone; follow the reuse guidance for the actual product.
Condition of the lash band:
The band needs to remain flexible, intact, and capable of following your lash line. Repeated removal can gradually stretch, kink, tear, or deform it, especially if you pull aggressively or remove stubborn adhesive with excessive force.
Once the band can no longer return to its proper shape, a remaining theoretical wear count should not be used as a reason to keep wearing the pair.
Amount of glue and makeup buildup:
Heavy adhesive, eyeliner, and mascara buildup can shorten practical reusability because each additional layer requires more cleaning and handling.
Manufacturer care guidance specifically recommends removing excess lash glue between wears, while some manufacturers note that skipping mascara on the false lashes can help you get more uses from them.
Using only the amount of adhesive you need and minimizing unnecessary product on the false-lash fibers can therefore make routine maintenance easier.
How carefully the lashes are removed and cleaned:
Gentle handling can make a meaningful difference to how many wears you get from a reusable pair. Pulling on the fibers, bending the band, scrubbing aggressively, or using an incompatible cleaning method can damage the lashes before they reach their expected reuse limit.
Official care guidance likewise connects lash longevity with careful handling, cleaning, and storage between applications.
Manufacturer’s reuse guidance:
Treat the manufacturer’s stated reuse limit as the most relevant starting point for your particular lashes. One product may be designed for only a few reuses, another for around 10, and another for 15 or more with proper care.
A manufacturer’s maximum is not a guarantee, however; replace the lashes earlier if the band, fibers, cleanliness, or overall condition makes another application unsuitable.
Condition Matters More Than Counting Uses Alone
Judge reusable false eyelashes by their actual condition before each application, not only by how many times you have worn them.
A manufacturer’s reuse number is generally based on proper care, and lash makers themselves note that longevity depends on how gently the lashes are handled, cleaned, and stored between uses.
Before reapplying a pair, check that the band is still flexible and intact, the fibers remain properly aligned, and old adhesive or makeup can be removed without aggressive cleaning.
Even if you are below the stated reuse limit, replace lashes that have become stretched, torn, permanently misshapen, heavily shed, or too contaminated to clean gently.
Conversely, a pair that remains in good condition may continue to be suitable within the manufacturer’s recommended reuse guidance.
In practical terms, the wear count is a useful reference, but the condition of the lashes determines whether another wear is appropriate.
Conclusion
Cleaning false eyelashes correctly can help you reuse suitable pairs while keeping their shape, appearance, and hygiene in better condition.
Start by identifying the lash type and checking the manufacturer’s care instructions, then remove the lashes and leftover adhesive gently before cleaning away mascara or makeup residue.
Use only compatible products, avoid unnecessary soaking or aggressive scrubbing, and allow the lashes to dry completely before storing them in a case.
Reuse should always depend on the condition of the lash band and fibers, not on a fixed wear count alone. If a pair becomes damaged, difficult to clean, causes irritation, or was worn during an eye infection, replace it instead.