
Published On: 21 August 2026
Applying false eyelashes can feel tricky the first time, but the process becomes much easier when you understand the order of each step and the small details that affect fit, comfort, and control.
This guide walks you through choosing beginner-friendly lashes, preparing your tools and natural lashes, checking your adhesive, measuring and trimming the band, applying glue correctly, positioning the strip, and blending the finished look.
You will also learn practical tips for hooded eyes, half lashes, eyeliner guides, hand stability, and clean application, plus answers about glue-free lashes, wearing falsies over extensions, and whether strip lashes sit above or below your natural lashes.
Follow the steps carefully, and you will avoid many common first-time application mistakes with greater confidence.
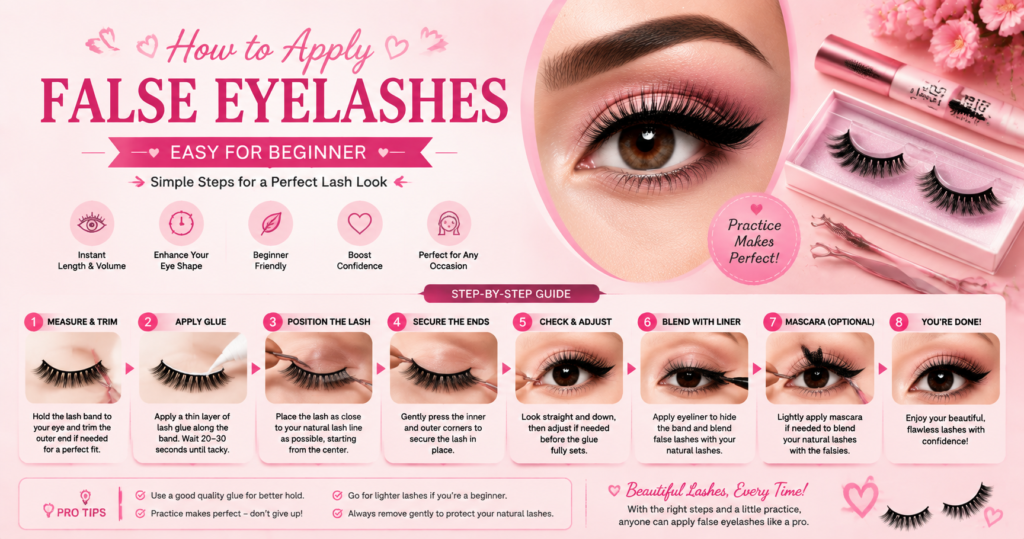
Choose the Right False Eyelashes for Your Eye Shape and Skill Level
Choose false eyelashes based on both how you want to shape your eyes and how confident you are with application.
Lash length distribution matters: styles with more length toward the outer corners can create a more elongated effect, while center-focused lashes can make the eyes appear more open and rounded. If you are applying false eyelashes for the first time, avoid choosing solely by how dramatic they look in the package.
A lightweight style of false eyelash, manageable length, and shorter or flexible band can be easier to position and adjust; half lashes are also commonly rated as beginner-friendly because there is less band to align across the lid.
Whatever style you choose, it should fit comfortably along your lash line without poking the corners or overwhelming the visible eye area.
Quick Note for Hooded Eyes
When applying false eyelashes to hooded eyes, consider how much visible lid space remains when your eyes are fully open.
Lightweight, fluttery lashes or shorter strips can add definition without making the upper eye area feel visually crowded, while some center-focused length can help emphasize openness.
Avoid assuming that hooded eyes require one specific lash style; the best option is the one whose length, curl, density, and band fit create your preferred effect without touching the brow area or feeling heavy.
Prepare Your Supplies
Set up everything you need before applying your false eyelashes so you do not have to search for tools while handling a delicate lash strip or tacky adhesive.
Keep your lashes, strip-lash adhesive, small lash scissors, tweezers or a lash applicator, a mirror, and an eyelash curler within easy reach; eyeliner and mascara can remain nearby if you plan to use them for finishing.
Work at a clean, stable surface with bright, even lighting, and position your mirror where you can comfortably look downward during placement. Resting your elbow on the table can also help steady your hand when precise positioning is needed.
Wash your hands first and make sure any tweezers, applicators, or other instruments used around the eye are clean, as FDA eye-cosmetic guidance specifically recommends clean hands and instruments to reduce contamination risk.
Preparing your workspace in advance also helps prevent rushed mistakes once adhesive has been applied.
Check Your Eye Area and Lash Adhesive Before You Start
Before applying false eyelashes, check that your eyelids and surrounding skin are healthy and free from active irritation, swelling, or infection.
The FDA advises avoiding eye cosmetics when you have an eye infection or inflamed skin around the eye and waiting until the area has healed. Next, read the lash adhesive label and use only an adhesive intended for the eye-area lash system you are applying.
Eyelid skin is delicate, and lash adhesives can cause irritation or allergic reactions in susceptible users, so ingredient awareness matters.
Some eyelash adhesives contain natural rubber latex, whose proteins can trigger an immune reaction in people with latex sensitivity; if you know or suspect you have a latex allergy, check the ingredient list carefully and contact the manufacturer or a healthcare professional if the formulation is unclear.
If an adhesive causes burning, persistent redness, swelling, or other irritation, stop using it rather than continuing the application.
Prep Your Natural Lashes and Finish Most Eye Makeup
Apply conventional strip lashes near the end of your eye-makeup routine, after you have completed most of your eyeshadow and eyeliner.
Finishing these steps first reduces the need to work around an attached lash band and helps keep eyeshadow fallout off the false lashes. Makeup-artist guidance commonly follows this order for strip-lash application.
Before reaching for the strip, make sure your natural lashes are clean, dry, and separated, then gently curl them if you want their angle to blend more closely with the false lashes.
Mascara timing is flexible rather than a strict rule: a light coat before application can help define and blend your natural lashes, while additional mascara afterward is optional if more blending is needed.
Avoid loading your natural lashes with several heavy coats beforehand, as clumped or stiff lashes can make precise strip placement more awkward. The goal at this stage is a finished eye look and a clean, manageable natural lash line ready for accurate false-lash placement.
Remove the Lash Strip From the Tray Carefully
Remove each false lash gently from its tray by gripping the lash band near one corner, not by pulling on the lash fibers.
Use clean fingers, tweezers, or a lash applicator to slowly lift the band away from the packaging while supporting it as you work across the strip. If the tray adhesive holds firmly, loosen the band gradually instead of yanking it free.
Pulling from the fibers is a common mistake that can bend, shed, or distort them before application and may also change the intended lash pattern. Once removed, hold the strip by its band whenever possible so the fibers maintain their original shape.
Measure, Trim, and Flex the Lash Band
Before applying glue, dry-fit the lash strip along your upper lash line to see whether the band matches the width of your eye.
If the strip extends beyond the outer corner, remove it from your eye and trim a small amount from the outer end, then check the fit again.
Never cut the band while it is resting against your eyelid, and avoid trimming a large section at once; removing too much can leave the strip too short to sit naturally across your lash line.
Once the length feels comfortable, gently flex the band into a soft curved or U shape so it follows the natural contour of your eyelid instead of springing upward at the corners.
If the manufacturer provides different trimming instructions for a particular lash design, follow those directions.
Apply Your Lash Glue Strategically and Let It Become Tacky
Apply a thin, even layer of strip-lash adhesive along the lash band, making sure the inner and outer ends are coated because poorly secured corners are more likely to lift.
Avoid adding a thick glob of glue; excess adhesive takes longer to reach a workable consistency, can spread beyond the band, and makes precise placement harder.
Once the band is coated, wait until the adhesive becomes tacky rather than remaining freshly wet. At this stage, the glue has enough initial grip to help the strip stay where you position it instead of sliding across the eyelid. Strip-lash adhesive instructions commonly specify this tacky stage before placement.
Do not rely on one universal waiting time, because adhesive formulas and manufacturer directions can differ; follow the instructions supplied with your specific glue. For example, some strip adhesives specify up to about 30 seconds to become tacky.
Look Down Into a Mirror, Not Straight Ahead
Before placing the lash strip, position a hand mirror slightly below your face and look downward into it instead of staring straight ahead.
This angle exposes more of your upper lash line while keeping your eye open, making it easier to see where the band should sit and to bring it close to the roots of your natural lashes.
Keep your head relatively steady and move your gaze downward rather than tilting your head far back. A common beginner mistake is using a vertical mirror at eye level, which can make the lash line harder to see and encourage awkward placement from the front.
Avoid fully closing your eye during positioning, as keeping the eye gently open helps you judge how the strip sits with your normal eye shape.
Place the Strip Along Your Upper Lash Line and Press It Into Place
Hold the strip near its center with your fingers or a lash applicator and lower the band onto the upper eyelid skin as close to the roots of your natural lashes as comfortably possible.
Traditional glue-on strip lashes sit above the natural lash line, not underneath the lashes like some underlash cluster systems. Secure the center first, then carefully position the inner and outer corners before gently pressing along the entire band to establish even contact.
Avoid placing the strip too high, as a visible gap can make the false and natural lashes look disconnected.
You should also avoid pressing the adhesive-coated band directly into your natural lashes, which can make removal more difficult and may tug them. If the strip keeps sliding while you position it, the adhesive may still be too wet; remove the strip carefully and allow the glue to become tackier rather than repeatedly dragging it across your eyelid.
Finally, check both corners and press down any area that is lifting.
Let the Adhesive Set
Once the strip is positioned correctly, gently press along the band and leave it undisturbed while the adhesive sets. Avoid repeatedly lifting, sliding, or repositioning the lash at this stage, because disturbing the band can weaken the developing bond and cause the inner or outer corners to lift.
Keep your eye relaxed and allow the adhesive to dry according to the instructions for your specific product rather than relying on a universal timer.
Strip-lash manufacturers likewise instruct users to hold the positioned lash securely while allowing the adhesive to dry completely. Once the band feels secure, you can move on to blending and finishing the lashes.
Blend Your Natural and False Lashes
Once the adhesive has fully set, check whether your natural lashes and false strip already appear unified before adding more product.
The goal of this finishing stage is to soften any visible separation between the two lash layers and disguise the strip band without disturbing the placement you have just secured.
1. Apply Mascara Only If Needed
Mascara after false-lash application is optional, not a required step. If your natural lashes already blend smoothly with the false fibers, you can leave them as they are.
If the two layers remain visibly separate, apply a light coat of mascara to help visually bring them together.
Avoid saturating the false lashes with several heavy coats, especially if you plan to reuse the strip, because unnecessary product buildup can make the fibers clump and require more cleaning.
Also wait until the lash adhesive is secure before using the mascara wand; brushing against a strip that is still setting can shift the band or loosen a corner.
2. Use Eyeliner to Camouflage the Strip Band
If the lash band or a small gap along the upper lash line remains visible, trace a thin line of eyeliner along the upper edge of the lash line and band to create a smoother transition.
Concentrate the liner only where camouflage is needed rather than automatically drawing a thick line, as excessive liner can change the makeup look instead of simply blending the strip.
Work gently once the adhesive has set so the eyeliner applicator does not push the band out of position. The finished line should visually connect your existing eye makeup with the false-lash band, making the strip appear more integrated with your natural lash line.
Check the Final Fit and Finish
Before considering the application complete, check both lashes with your eyes open in their natural position. Make sure the inner and outer corners are secure, the bands sit at a similar height, and the overall shape looks reasonably balanced on both eyes.
The lash band should feel comfortable rather than poke, pinch, or press against the eye. If one corner is lifting, gently secure that area instead of covering the problem with extra eyeliner.
If the band feels too long or repeatedly irritates a corner, remove the lash and correct the fit rather than tolerating the discomfort. Stop wearing the lashes if you develop persistent burning, redness, swelling, or irritation around the eye.
Beginner Do’s & Don’ts for Applying Fake Lashes
1. Do: Try Half Lashes if a Full Strip Feels Difficult
If positioning a full strip feels difficult, try half lashes that cover mainly the outer portion of your lash line. The shorter band gives you less material to align and fewer points to secure, which can make placement more manageable while you develop control.
Half lashes can also add outer-corner definition without requiring a full-width strip. However, do not assume a shorter lash will automatically fit perfectly—dry-fit it first and adjust the position or band length if needed.
If you repeatedly trim a large portion from standard strips, choosing a purpose-made half lash may be a more practical option.
2. Do: Pay Attention to Band Width and Flexibility
Look beyond lash length and volume when choosing a strip and check how wide, thick, and flexible the band feels.
A flexible band can follow the natural curve of your eyelid more easily, while a band that is too wide for your lash line may poke at the corners or resist sitting comfortably.
Thin or discreet bands can be particularly manageable for beginners, but the most important factor is whether the specific band fits and conforms to your eye.
Before adding glue, dry-fit the strip and gently flex it into a curve. Do not try to compensate for a poorly fitting or rigid band simply by adding excessive adhesive.
3. Do: Finish Most Eyeshadow and Eyeliner Before Applying the Lashes
Apply strip lashes after you have completed most of your eyeshadow and eyeliner. Doing your eye makeup first keeps shadow fallout away from the false-lash fibers and prevents you from having to work brushes around an already secured band.
Eyeliner can also create a useful visual guide for placing the strip close to your natural lash line. A common mistake is attaching the lashes too early and then trying to finish detailed eye makeup around them, which can disturb the band or deposit powder onto the lashes.
Complete the main eye look first, apply your false lashes near the end, and make only small finishing adjustments afterward.
4. Do: Consider Individual Lashes for More Targeted Placement
If a full strip gives you more length or volume than you want, individual lashes let you add enhancement only where it is needed.
You can place a few small lash units in sparse areas or concentrate them toward the outer portion of the lash line instead of covering the entire eye with one fixed strip.
This targeted placement can create a more customized effect, but avoid adding too many pieces at once; building gradually makes it easier to control symmetry, density, and overall shape.
5. Do: Gently Blend the Lashes After the Adhesive Sets
Once the adhesive is secure, gently bring your natural and false lashes closer together if you can still see separation between them. Lightly pressing the two layers together near the lash line can create a more unified appearance without disturbing the strip.
Avoid aggressively squeezing or repeatedly re-curling the lashes simply because the strip is attached; too much pressure can shift the band, bend the false fibers, or make an otherwise secure application uncomfortable.
If your natural lashes already sit neatly against the false lashes, no additional blending is necessary.
6. Don’t: Apply Lash Adhesive Directly to Your Eyelid or Waterline
For conventional glue-on strip lashes, apply the adhesive to the lash band as directed by the product instructions, then position that band on the upper eyelid skin close to your natural lash roots.
Do not paint lash glue directly onto the eyelid or waterline, and keep the adhesive away from the surface of the eye. The skin around the eyes is delicate, and poorly applied glued lashes can cause irritation or allow the lash fibers to contact and scratch the cornea.
If glue accidentally enters your eye or you develop significant pain, persistent redness, swelling, or irritation, stop the application rather than trying to continue.
7. Do: Use a Thin Eyeliner Line as a Placement Guide
If you find it difficult to judge where the strip should sit, draw a thin line of eyeliner along your upper lash line before application. The line gives you a visible path to follow when lowering the lash band and can also make a small gap less noticeable once the strip is secured.
Keep the line thin if you only need it as a guide; drawing a much thicker line than intended can change your makeup look without improving placement. Keep this guide on the upper lash line rather than using the waterline for strip positioning.
8. Do: Stabilize Your Hand Before Placement
Give your hand a stable base before bringing the lash toward your eye. Sit at a table or vanity and rest your elbow or forearm on a steady surface while holding the strip with your fingers or lash applicator.
This reduces unnecessary hand movement and gives you finer control when aligning the center and corners of the band. Avoid trying to rush the placement with your arm unsupported, especially during your first few applications; if your hand starts shaking or the angle feels awkward, reset your position before moving the adhesive-coated strip toward your eye.
9. Do: Work in a Clean, Well-Lit Area
Apply false eyelashes in a clean workspace with bright, even lighting so you can clearly see the lash band, your upper lash line, and the tools you are using near your eyes.
Wash your hands beforehand and make sure tweezers, lash applicators, and other eye-area tools are clean.
Poor lighting can make precise positioning unnecessarily difficult, while dirty hands or instruments can introduce contamination around the eye. Clear the immediate workspace of dust and clutter and keep everything you need within reach before you begin.
Can You Apply False Eyelashes Without Glue
Yes, you can apply false eyelashes without separate liquid lash glue if the lashes are specifically designed for glue-free application.
Pre-glued or self-adhesive lashes already have a bonding layer on the band, while magnetic lashes use magnetic attachment, either with compatible magnetic eyeliner or paired magnetic strips.
Conventional glue-on strip lashes are different and should be applied with the adhesive intended for that lash system. Do not try to make standard strips “glue-free” by improvising another attachment method, as poor adhesion can cause lifting or uncomfortable placement.
Always follow the instructions for the specific no-glue lash system you choose.
Can You Apply False Lashes Over Eyelash Extensions
It is generally best not to apply strip false lashes over professional eyelash extensions. Strip-lash adhesive can attach to the extensions as well as the eyelid, and removing the strip later may pull, twist, or prematurely detach the extensions and potentially tug on the natural lashes supporting them.
Lash professionals therefore commonly advise against routinely layering strip lashes over extensions. This matters because the American Academy of Ophthalmology notes that repeated rubbing, tugging, or pulling can fracture natural eyelashes and potentially damage their follicles.
If your extensions have developed noticeable gaps or no longer provide enough volume, having them professionally filled or discussing a suitable temporary option with your lash technician is safer than covering the existing set with a conventional glued strip.
Do You Apply False Lashes Above or Below Your Natural Lashes
Traditional glue-on strip lashes are applied above your natural lashes, with the band resting on the upper eyelid skin as close to the natural lash roots as comfortably possible.
The adhesive should go on the strip band rather than directly onto your natural lashes, and the band should not sit on the waterline. Placing a conventional strip too high can leave an obvious gap, while attaching it directly to your natural lashes can make removal more difficult and may cause unnecessary tugging.
Lashes designed specifically for underlash application are different: these are usually clusters or segmented systems made to sit beneath the natural lashes and should be applied only according to that product’s instructions. Do not use a standard strip underneath your lashes simply to imitate an underlash system.
How to Remove False Eyelashes Safely After Wear
Remove false eyelashes gently rather than pulling the strip off quickly, as unnecessary tugging can stress your natural lashes and delicate eyelid skin. Start at the outer corner and ease the band away gradually, softening stubborn adhesive first if needed.
For the complete removal process, adhesive-residue cleanup, and aftercare tips, see our step-by-step guide on how to remove false eyelashes safely.
Conclusion
Applying false eyelashes successfully comes down to preparation, fit, adhesive control, and careful placement.
Choose a lash that suits your eye shape and skill level, prepare a clean workspace, dry-fit and trim the band, let the adhesive become tacky, and place the strip close to your natural lash roots.
Once secure, blend only as much as needed and check that both corners feel comfortable. Beginners can make the process easier with half lashes, flexible bands, a downward-facing mirror, steady hand support, and a thin eyeliner guide.
Whether you use glue-on, pre-glued, magnetic, or underlash products, always follow the instructions designed for that specific lash system and stop if irritation occurs.