
Published On: 26 August 2026
Choosing the right individual lash map can completely change how the eyes appear, but the best results come from understanding how lash placement, length, curl, and density work together.
An individual lash map is a planned guide that determines where different individual lashes should be applied across the natural lash line to create a specific eye effect.
In this guide, we explain how individual lash maps differ from strip and cluster lash styles, how lash zones control the final appearance, and how different map styles such as natural, cat eye, doll eye, open eye, squirrel, and wispy create different effects.
We also cover how to choose a suitable map for different eye shapes and avoid common individual lash mapping mistakes.
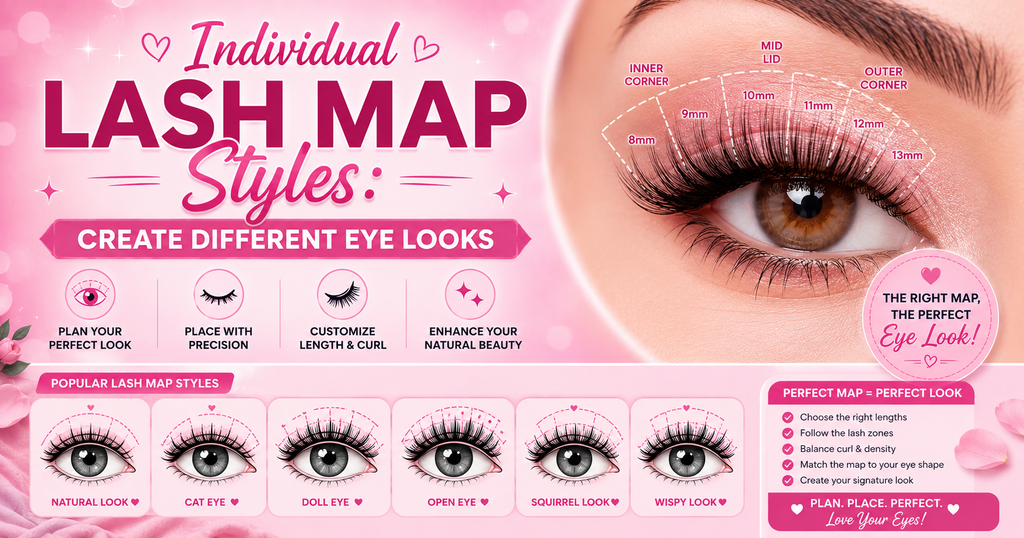
What Is An Individual Lash Map
An individual lash map is a planned placement guide that shows where different individual lashes should be applied across the natural lash line to create a specific eye effect.
The map helps organize lash placement before application instead of choosing lengths randomly during the process.
Individual lash mapping uses separate lash sections because each individual lash is attached independently to a natural lash.
The natural lash line is divided into different zones during individual lash mapping because each area can require different lash lengths and placement patterns.
Lash zones help control where visual focus is created because changing the length distribution in each zone can make the eyes appear more open, elongated, lifted, or natural.
Lash lengths are assigned to different sections of the lash map because shorter and longer individual lashes create different levels of emphasis across the eye.
Lash curls are selected as part of individual lash mapping because curl type affects how much lift and openness the lashes create.
Lash density is included in an individual lash map because the number and spacing of lash pieces influence the final fullness of the look.
Individual lash mapping gives more control over customization because the lash artist or user can plan the placement, length, curl, and density before application. A well-planned map helps create a more consistent result instead of relying on random lash placement.
How Individual Lash Maps Differ From Strip Lash And Cluster Lash Maps
Individual lash maps require a different approach from strip lashes and cluster lashes because each lash type has a different structure and application method. Understanding these differences helps explain why individual lashes allow more detailed customization during mapping.
Strip lashes use a pre-designed lash band where the style, length pattern, and shape are already built into the lash strip.
Cluster lashes contain multiple lash fibers grouped together into one small section that is applied as a unit.
Individual lashes are applied separately to individual natural lashes, which creates more control over the final lash design.
Individual lash mapping allows more precise length transitions because different lash lengths can be placed gradually across specific lash zones.
Individual lashes provide spacing control because each lash piece can be positioned with intentional gaps or closer placement depending on the desired density.
Individual lash placement allows better control over lash direction because each lash can follow the natural lash growth pattern.
Individual lash maps allow greater eye-shape customization because the placement plan can be adjusted according to the person’s eye structure and desired effect.
Strip lashes and cluster lashes provide pre-arranged designs, while individual lashes allow the map itself to create the design. This makes individual lash mapping a more customizable approach for creating specific eye effects.
Key Elements Used In Individual Lash Mapping
1. Individual Lash Length Selection
Individual lash length selection determines how the final lash map changes the appearance of the eyes.
Different lengths are placed across lash zones to create specific effects, such as a natural, lifted, or more open appearance.
Short individual lashes are usually placed in areas that need a softer transition, such as the inner corner of the lash line.
Medium individual lashes are used between shorter and longer sections because they create a smoother length transition across the lash line.
Longer individual lashes create emphasis in selected areas because increased length can change where attention is focused.
The chosen lash length should match natural lash strength because excessive length can add unnecessary weight to the natural lashes.
A suitable length balance helps create the desired style while maintaining a more controlled lash design.
2. Individual Lash Curl Selection
Individual lash curl selection affects the lift and direction of the final lash design because curl changes how the lashes appear when viewed from the front. Different curls can create different levels of openness, lift, and intensity in an individual lash map.
A stronger individual lash curl can create a more lifted appearance because the lash fibers curve upward and become more visible from the front.
A softer individual lash curl creates a more natural appearance because the lash direction stays closer to the natural lash movement.
The chosen curl should match the natural lash direction because the individual lash needs to blend with the existing lash line.
The desired eye style also influences curl selection because different lash maps require different levels of lift.
The correct curl choice helps individual lashes create the intended eye effect while maintaining harmony with the natural lash line.
3. Individual Lash Density And Spacing
Individual lash density and spacing control how full or natural the final lash design appears because individual lashes can be placed with more flexibility than pre-made lash styles.
The placement pattern determines whether the result looks soft, defined, or more dramatic.
Individual lash density affects fullness because adding more lash pieces across the natural lash line creates a thicker overall appearance.
Individual lash spacing affects the final style because the distance between lash pieces changes how soft or intense the lash line appears.
Individual lashes allow gradual density customization because each lash piece is applied separately instead of being fixed to a single lash band.
The lash density should match the natural lash strength because adding excessive weight or too many lash pieces can affect the balance of the lash design. A controlled density creates a more suitable result for the individual lash map.
4. Lash Line Zones In Individual Lash Mapping
Lash line zones are the main sections used in individual lash mapping because each area of the eye contributes differently to the final lash style.
Dividing the lash line into zones helps control where length, density, and focus are added during application.
The inner corner zone uses shorter individual lashes because this area creates the starting point of the lash design. Shorter lengths help create a smooth transition from the natural inner lashes to the longer sections of the map.
The center zone controls the eye-opening effect because lash placement in this area creates the main visual focus of the lash design. Longer lengths placed around the center can make the eyes appear more open and noticeable.
The outer corner zone controls elongation and lift because longer individual lashes in this area can create a stretched eye appearance. The amount of length added to the outer zone should be balanced because excessive weight can change the overall eye shape.
The transition between inner, center, and outer zones creates the final lash style because each section works together to form the planned individual lash map.
Popular Individual Lash Map Styles
1. Natural Individual Lash Map
The natural individual lash map is designed to enhance the existing lash line while maintaining a soft and balanced appearance. This map focuses on creating a smooth length transition instead of adding extreme changes in lash length.
The natural lash map uses shorter individual lashes in the inner corner, gradually increasing to medium lengths through the center area. The outer corner usually follows a controlled length transition to keep the overall lash design balanced.
The length distribution in a natural individual lash map follows the natural shape of the eye because the goal is to add definition without creating a dramatic change. The gradual increase and decrease in lengths help the individual lashes blend with the natural lash line.
The final appearance of a natural lash map creates subtle definition because the placement enhances the eyes while keeping the lash style close to a natural look. This makes the style suitable for everyday wear and users who prefer a softer enhancement.
The natural individual lash map is often suitable for beginners because the balanced placement pattern is easier to customize and maintain. The style allows users to understand individual lash placement before moving to more dramatic mapping styles.
2. Cat Eye Individual Lash Map
The cat eye individual lash map is designed to create an elongated eye appearance by increasing lash length toward the outer section of the lash line. This mapping style focuses on extending the visual direction of the eyes while maintaining a controlled transition between lash zones.
The cat eye lash map uses shorter individual lashes in the inner corner because the style builds length gradually across the lash line. The shorter starting lengths help create a smooth transition toward the longer outer sections.
The outer lash zones contain longer individual lashes because increased length in this area creates a more extended and lifted eye effect. The placement of longer lashes toward the outer corner helps draw attention outward and creates the characteristic cat eye appearance.
The cat eye individual lash map is suitable for creating a lifted look because the length distribution changes the visual direction of the lash line. This style is commonly chosen when the goal is to create a more elongated eye shape.
The outer corner length should be balanced carefully because excessive weight in this area can make some eyes appear heavier or lower. The final map should consider the person’s eye shape and natural lash strength before adding longer individual lashes.
3. Doll Eye Individual Lash Map
The doll eye individual lash map is designed to create a more open and rounded eye appearance by placing the longest individual lashes around the center area of the lash line.
This placement pattern shifts the visual focus toward the middle of the eye instead of extending the shape outward.
The doll eye lash map uses shorter individual lashes in the inner and outer corners because the center area is designed to remain the main focal point.
The shorter corner lengths help create a balanced transition around the longest section.
The center lash zone contains longer individual lashes because increased length in this area creates a more open-eye effect. This placement draws attention upward and can make the eyes appear wider and more noticeable.
The doll eye individual lash map is suitable for creating a softer, more rounded appearance because the length distribution focuses on opening the eye rather than extending it sideways.
The style is often selected when the goal is a brighter or more awake-looking effect.
The final appearance depends on the balance between lash length, natural lash shape, and eye structure because the same map can create different results on different eyes. Proper length selection helps maintain a harmonious individual lash design.
4. Open Eye Individual Lash Map
The open eye individual lash map is designed to make the eyes appear more lifted and awake by concentrating the lash design around the central eye area.
This style is similar to the doll eye map but focuses more on creating a visible opening effect rather than only creating a rounded appearance.
The open eye lash map places the most noticeable individual lash lengths around the center area because this placement draws attention upward and creates a brighter eye effect. The corner sections usually use shorter lengths to maintain a balanced transition.
The open eye lash map differs from the doll eye map because it focuses on enhancing eye openness rather than creating a rounded eye shape.
The length placement is adjusted to emphasize a lifted and refreshed appearance.
The open eye individual lash map is often chosen for eyes that need more visible lift because the central length placement helps create the impression of a more open eye area.
The final result depends on the natural eye structure and selected lash lengths.
The balance between center length and corner lengths is important because excessive central length can change the intended effect.
A controlled map helps create an open appearance while keeping the individual lashes proportional to the natural lash line.
5. Squirrel Individual Lash Map
The squirrel individual lash map creates a lifted eye appearance by placing the longest individual lashes slightly before the outer corner instead of concentrating maximum length at the edge.
This placement creates a balanced transition between an open-eye effect and an elongated lash style.
The squirrel lash map places the peak lash length before the outer corner because this position creates lift without adding excessive weight to the edge of the eye. The outermost lashes gradually become shorter to maintain a softer finish.
The outer corner uses reduced individual lash lengths because the map avoids the heavy downward effect that can occur with very long outer lashes. This creates a more lifted appearance while keeping the lash design balanced.
The squirrel individual lash map differs from the cat eye map because the longest point is moved inward rather than being placed at the outer edge. This adjustment helps create elongation while maintaining a lifted look.
The squirrel map can be suitable for eyes where excessive outer-corner length may appear heavy because the peak length placement creates a more controlled shape. The final result still depends on eye structure, natural lash direction, and selected lash lengths.
6. Wispy Individual Lash Map
The wispy individual lash map creates a textured lash appearance by combining different individual lash lengths instead of using one consistent length pattern.
This style focuses on creating dimension through controlled variation between shorter base lashes and longer accent pieces.
The wispy lash map uses base individual lashes to create the foundation of the lash line because these shorter lengths provide overall coverage and structure. The base layer helps maintain balance while supporting the longer textured sections.
Longer accent individual lashes are added as spikes because these pieces create the noticeable peaks that define the wispy effect.
The spike placement can be distributed across selected lash zones to create a more customized texture.
Uneven lash lengths create the feathered appearance of a wispy map because the variation prevents the lash line from looking completely uniform. The contrast between shorter and longer lashes adds movement and dimension.
The spike placement should follow the planned lash map because random placement can create an unbalanced texture.
Controlled spacing between longer accent lashes helps maintain a softer and more intentional appearance.
The wispy individual lash map is different from a basic eye-shape map because it adds texture as well as changing the overall eye effect. The final result depends on the combination of lash placement, length variation, and density.
Individual Lash Map Styling to Choose Based on Eye Shape
1. Individual Lash Maps For Almond Eyes
Almond eyes have a balanced shape that can work well with many individual lash map styles because the eye structure already provides a natural symmetry.
The best lash map choice depends on the desired final effect rather than needing to correct a specific eye shape.
A natural individual lash map can enhance almond eyes by following the existing eye shape with gradual length changes across the lash line. This style maintains the natural balance while adding definition without changing the overall appearance.
A cat eye individual lash map can create a more elongated effect on almond eyes because longer lashes toward the outer zones draw attention outward. This option is suitable when the goal is to create a lifted or more dramatic appearance.
A doll eye or open eye individual lash map can make almond eyes appear more open because longer lengths are focused around the center area. This placement shifts attention toward the middle of the eye and creates a brighter effect.
A wispy individual lash map can add texture to almond eyes because varied lengths and accent spikes create a more dimensional lash appearance. The final style depends on the preferred level of fullness and texture.
The most suitable individual lash map for almond eyes depends on the desired effect, including natural definition, elongation, openness, or added texture.
2. Individual Lash Maps For Round Eyes
Round eyes often have a more open and noticeable appearance, so individual lash mapping for this eye shape usually focuses on creating a balanced elongated effect. The goal is to extend the visual direction of the eyes while maintaining harmony with the natural eye structure.
A cat eye individual lash map can help elongate round eyes because longer individual lashes are placed toward the outer lash zones. This placement draws attention outward and creates a more extended eye appearance.
A squirrel’s individual lash map can suit round eyes because the longest lashes are placed slightly before the outer corner instead of directly at the edge. This creates lift while avoiding excessive weight on the outer area.
The lash length transition should be gradual for round eyes because sudden changes between short and long individual lashes can make the lash design appear less balanced. A controlled transition helps create a smoother elongated effect.
The final individual lash map choice depends on the desired result because some users may prefer a subtle elongation while others may want a more dramatic lifted appearance. Eye structure and natural lash condition should also be considered before selecting the map.
3. Individual Lash Maps For Hooded Eyes
Hooded eyes often have limited visible eyelid space because the skin fold covers part of the eyelid area, so individual lash mapping usually focuses on creating a more visible lift effect.
The goal is to place lashes in a way that keeps the eyes looking open without adding unnecessary heaviness.
An open eye individual lash map can suit hooded eyes because longer lashes are concentrated around the center area to create a lifted and more visible eye appearance.
This placement helps draw attention upward rather than adding extra weight to the outer corners.
A squirrel individual lash map can work well for hooded eyes because the longest lash point is placed before the outer corner instead of directly at the edge.
This positioning creates elongation while avoiding a heavy outer section that may emphasize the hooded area.
The lash length should be controlled for hooded eyes because excessively long individual lashes can press against the eyelid fold or make the lash design appear heavier.
A balanced length selection helps maintain a comfortable and lifted result.
The final individual lash map should consider the amount of eyelid space, natural lash direction, and desired effect because hooded eyes can vary significantly between individuals. A customized placement approach creates a more suitable lash design.
4. Individual Lash Maps For Downturned Eyes
Downturned eyes have a natural downward direction at the outer corners, so individual lash mapping usually focuses on creating a lifted appearance without adding extra weight to the lower outer area.
The goal is to balance the eye shape by controlling where length and emphasis are placed.
Lift-focused individual lash maps can suit downturned eyes because they place attention on areas that create a more elevated lash effect.
These maps avoid relying only on very long outer corner lashes, which may increase downward emphasis.
A squirrel individual lash map can work well for downturned eyes because the longest individual lashes are placed before the outer corner instead of directly at the edge.
This placement creates lift while keeping the outer section lighter.
An open eye individual lash map can also complement downturned eyes because the center lash zone creates upward focus. The increased emphasis around the middle area helps create a more open-looking appearance.
The outer corner length should be controlled for downturned eyes because excessive length at the edge can add visual weight to the area. A balanced transition between lash zones helps maintain a lifted and harmonious result.
The most suitable individual lash map depends on the degree of downward angle, natural lash direction, and desired final effect because every eye shape requires customized placement.
How To Create An Individual Lash Map Before Application
Creating an individual lash map before application helps organize lash placement by defining the length, style, and position of each section before attaching individual lashes. A planned map allows better control over the final eye effect and helps avoid random placement.
Step 1: Analyze eye shape before creating the lash map because the eye structure determines which placement style will create the most balanced result. The chosen map should consider features such as eye direction, eyelid space, and the desired appearance.
Step 2: Divide the lash line into zones because each section requires different length and placement decisions. The inner corner, center zone, and outer corner zone help create a structured transition across the lash line.
Step 3: Choose the desired eye effect because the final style determines where longer and shorter individual lashes should be placed. A natural, cat eye, doll eye, or lifted effect requires a different length distribution.
Step 4: Assign lash lengths to each zone because length placement controls where attention is focused on the eye. Shorter, medium, and longer individual lashes should create a smooth transition rather than sudden changes.
Step 5: Consider natural lash strength because individual lashes need to match the ability of the natural lash to support added length and weight. Choosing suitable lash lengths helps maintain a balanced application.
Step 6: Apply individual lashes according to the planned map because following the prepared design creates a more consistent result. The placement should follow the selected zones, lengths, and desired eye effect.
Common Individual Lash Mapping Mistakes
1. Using The Same Lash Length Across The Entire Lash Line
Using the same individual lash length across the entire lash line can reduce the impact of a lash map because different eye zones require different length variations to create a specific effect.
A balanced individual lash design usually depends on controlled changes between shorter and longer lash sections.
The same lash length across all lash zones can create a flat appearance because the eye loses the gradual transition between inner, center, and outer sections.
The absence of different lash lengths removes dimension because the placement does not create specific areas of focus across the eye.
A consistent lash length pattern may limit eye-shape customization because the same design is applied regardless of the person’s natural eye structure.
The individual lash map should use planned length variations because the goal is to create a controlled shape rather than a uniform lash line. Proper length distribution helps individual lashes create the intended style and overall appearance.
2. Making Outer Corners Too Heavy
Making the outer corners too heavy is a common individual lash mapping mistake because excessive length or density in the outer zone can change the visual balance of the eyes. The outer corner placement should support the desired style without adding unnecessary weight to one area.
Long individual lashes placed heavily on the outer corner can create a downward-dragging appearance because the visual focus becomes concentrated at the edge of the eye.
The outer corner length should be adjusted according to eye shape because the same cat-eye style may not create the same result on every person.
Downturned and hooded eyes often require careful outer corner planning because excessive outer weight can emphasize the downward direction of the eye.
The individual lash map should consider outer corner density and length because the goal is to enhance the eye shape rather than overpower it.
3. Ignoring Natural Lash Strength
Ignoring natural lash strength can affect the quality of an individual lash map because each natural lash has a limit to how much added weight it can support. A suitable lash design should consider the condition and strength of the natural lashes before selecting longer or heavier lash pieces.
Longer individual lashes create more weight because they add additional length and material to the natural lash attachment point.
The natural lashes should be evaluated before choosing individual lash lengths because stronger and weaker natural lashes may require different mapping decisions.
The individual lash map should match the natural lash capacity because the goal is to create the desired eye effect without placing unnecessary stress on the natural lashes.
Beginners often focus on achieving a dramatic look and overlook natural lash strength because longer lashes appear more noticeable. However, the correct lash map should balance appearance with the ability of natural lashes to support the selected style.
4. Copying Another Person’s Lash Map
Copying another person’s individual lash map can create unexpected results because eye shape, eyelid structure, and natural lash direction vary from person to person. A lash map that works well for one individual may not create the same effect on another eye shape.
The same individual lash map can look different on different people because each eye has unique proportions and natural lash characteristics.
A copied lash map may not suit the natural lash line because the original design was created for a different eye structure.
The desired eye effect should guide individual lash mapping decisions because a specific style name does not guarantee the same outcome for everyone.
Individual lash maps work best when they are customized because the placement should support the person’s natural features rather than simply recreate another person’s lash design.
How to Put on Individual Lashes
Individual lashes are put on one piece at a time using tweezers and a compatible lash adhesive. Start with clean natural lashes, organize the lash lengths you plan to use, and apply only a small amount of adhesive to each lash base.
Position the lashes close to the natural lash line while following the direction of your existing lashes, then build the density gradually to keep both eyes balanced. Avoid overcrowding one area or using excessive glue, as both can make placement harder and affect the final look.
If you want the complete step-by-step process, preparation tips, placement techniques, and common mistakes to avoid, read our guide on How to Put on Individual Lashes.
Conclusion
Individual lash mapping allows greater control over lash placement because each lash piece is applied separately and can be customized through length, curl, density, and spacing choices.
Different individual lash map styles create different eye effects, with natural maps providing soft enhancement, cat eye maps creating elongation, doll and open eye maps focusing on openness, squirrel maps adding lift, and wispy maps creating texture through varied lengths.
The most suitable lash map depends on eye shape, natural lash strength, and the desired appearance. A customized approach helps create a balanced individual lash design instead of simply copying another person’s style.