Published On: 20 March 2025
Struggling to remove fake nails without damaging your natural ones? You’re not alone!
Whether it’s acrylic or gel nails, improper removal can leave your real nails weak, brittle, or even infected. Did you know that keeping acrylic nails on for too long can cause damage over time? If you’re wondering how to safely take them off at home without expensive salon visits, you’re in the right place.
Many people ask:
Does keeping fake nails on for too long harm natural nails?
What’s the safest way to remove acrylic and gel nails?
Can household items like dish soap or dental floss help?
According to sciencedirect, acetone is the effective way to dissolve acrylic nails, but can dry out the nails and cuticles (AAD). That’s why understanding the chemistry behind fake nails and removal techniques is crucial to maintaining healthy, strong nails.
With years of experience in nail care and research-backed methods, this article will guide you through the safest techniques to remove acrylic and gel nails—with and without acetone.
You’ll also discover whether DIY methods like dish soap or dental floss actually work and how often you should take a break from fake nails to protect your natural ones.
By the end of this article, you’ll know:
✔ The best and safest ways to remove fake nails at home
✔ The essential tools you’ll need for removal
✔ Whether prolonged wear causes damage
Let’s dive in! 🔽
Chemistry of Fake Nails & Fake Nail Removals
Fake nails are typically made from either acrylic or gel materials, each with its unique chemical composition. According to Katri Suuronen & Team, Acrylic nails are created by mixing a powder, usually made of polyethyl methacrylate (PMMA), with a liquid monomer like ethyl methacrylate (EMA).
The liquid monomer reacts with the powder, initiating a polymerization reaction that forms a solid, durable structure. Acrylic nails are known for their rigidity, strength, and ability to be shaped into any design.
In contrast, gel nails are composed of photo-activated resins, which typically contain methacrylate-based compounds. These resins harden when exposed to UV or LED light, undergoing a process of polymerization that transforms the liquid resin into a solid and flexible nail.
This curing process results in gel nails being more flexible and glossy compared to acrylics. However, gel nails can be more difficult to remove due to their strong adhesive properties.
Press-on nails, on the other hand, are typically made from thermoplastic polymers like ABS (Acrylonitrile Butadiene Styrene) or polycarbonate, providing a more temporary and lightweight option.
These materials are easily molded and provide a quick application, but they lack the long-lasting durability of acrylic or gel nails.
When it comes to removing fake nails, different substances are used to break down the materials and facilitate the removal process. Acetone is the most commonly used remover, especially for acrylic nails.
Acetone, as a polar solvent, effectively dissolves acrylic polymers by breaking their chemical bonds, making it the fastest and most efficient method for acrylic nail removal.
However, according to sciencedirect, acetone is harsh on the skin and nails, often causing dryness. For a gentler alternative, non-acetone removers, which contain solvents like ethyl acetate or isopropyl alcohol, can be used. While not as potent as acetone, non-acetone removers are kinder to the skin and nails.
Lastly, oil-based removers made from ingredients like vegetable oils or citrus oils help soften the adhesive used for press-on nails and may take longer to work.
These removers are gentler on the nails and skin and offer moisturizing benefits during the process, though they require more time for effective removal.
Does Keeping Fake Nails For Long Cause Harm?
Yes, extended use of fake nails weakens natural nails and causes damage over time.
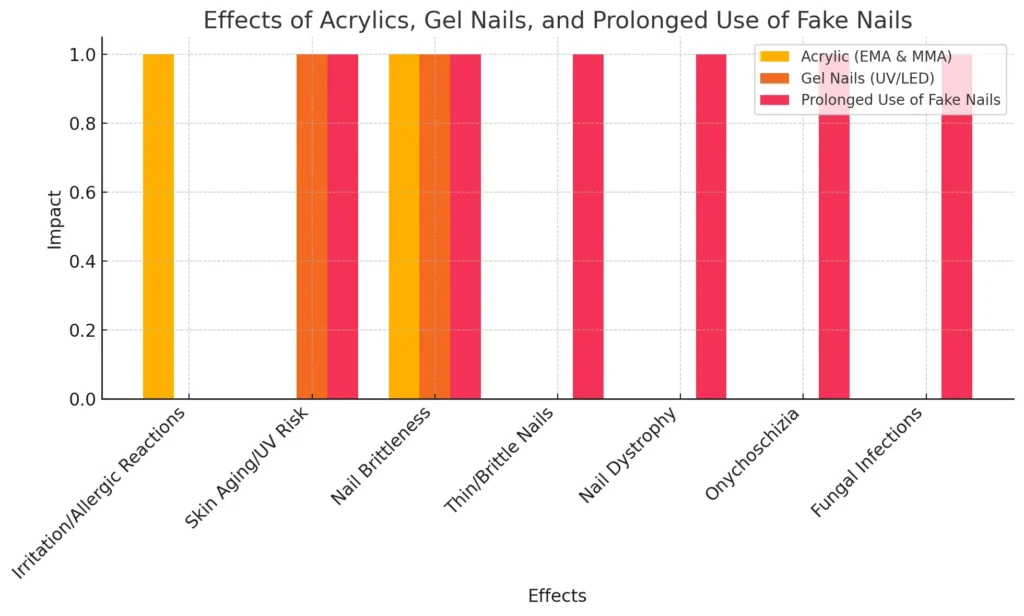
According to the American Academy of Dermatology, Acrylic nails require roughening the nail surface through filing to ensure proper adhesion, which thins and weakens the natural nail plate.
The chemicals used in acrylics, such as ethyl methacrylate (EMA) and methyl methacrylate (MMA), cause irritation and allergic reactions in some individuals. Gel nails, while less damaging initially, still require exposure to UV or LED light for curing, which contribute to skin aging and increase the risk of nail brittleness.
Additionally, American Academy of Dermatology states that maintaining fake nails for long periods requires frequent touch-ups every 2–3 weeks as natural nails grow. Repeated exposure to chemicals and filing significantly weaken the nails, leaving them thin, brittle, and dehydrated.
Prolonged use of artificial nails lead to nail dystrophy, onychoschizia (nail splitting), and even fungal infections if moisture gets trapped between the artificial and natural nail.
While artificial nails offer aesthetic benefits, their long-term use demands careful maintenance to minimize damage to natural nails. Whether you’re wearing a gel nail in Dubai or acrylic nail in Dubai, removing them properly is essential to prevent damage and keep your natural nails healthy.
What Are The Item Required to Remove Fake Nails
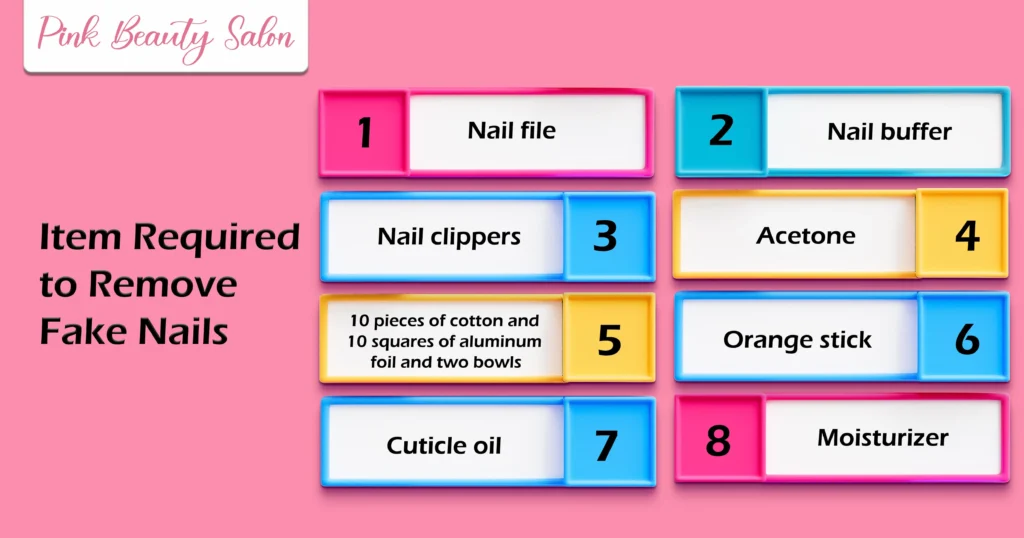
Proper removal of fake nails requires specific tools to ensure a smooth process while minimizing damage to the natural nails
Nail file: To buff off the top coat and remove the shiny layer.
Nail buffer: To smooth the surface after removal.
Nail clippers: To trim long artificial nails, making removal easier.
Acetone: A strong solvent needed for dissolving acrylic and gel nails.
10 pieces of cotton and 10 squares of aluminum foil and two bowls: Used for soaking and wrapping nails to break down the artificial layers. Alternatively, two bowls can be used for the soaking method.
Orange stick: To gently push off softened residue.
Cuticle oil: To rehydrate and nourish nails after removal.
Moisturizer: To replenish lost moisture and prevent dryness.
How To Remove Fake Nails ( Acrylic & Gel ) With Acetone
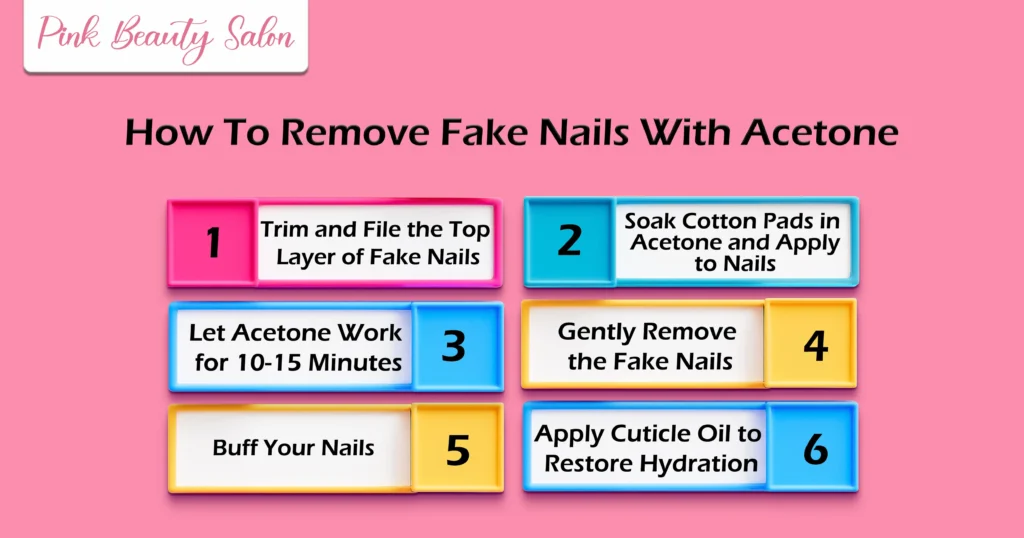
Removing fake nails at home using acetone requires a precise technique to prevent damage to your natural nails. Follow this step-by-step guide for safe and effective removal:
Step 1: Trim and File the Top Layer of Fake Nails
The first step in removing fake nails is to trim them and file down the top layer. This helps break the protective coating, allowing acetone to penetrate more efficiently.
How to File Properly:
- Use a 180- to 240-grit nail file.
- Gently file in a left and right motion.
- Avoid back-and-forth movements to prevent friction and heat buildup.
- Do not over-file the same spot, as this weakens the nail structure.
According to Nail Surgery, nails consist of three primary structures: the nail plate, nail matrix, and nail bed. The nail matrix controls growth, and excessive filing weakens it, leading to irregular growth patterns and potential deformities.
Filing correctly ensures that only the artificial layer is removed, allowing acetone to work effectively without excessive scraping.
Step 2: Soak Cotton Pads in Acetone and Apply to Nails
Once the top coat is removed, the next step is soaking your nails in acetone to dissolve the adhesive and loosen the fake nails.
How to Apply Acetone Properly:
- Do not soak your fingers directly in acetone to prevent excessive skin exposure.
- Take cotton pads cut to match the size of your nails.
- Soak them in 100% pure acetone.
- Apply a thin layer of petroleum jelly around your nails to protect the surrounding skin.
- Place the acetone-soaked cotton pads on your nails.
- Wrap each nail with food plastic wrap to secure the pads in place.
Research shows that acetone is a strong solvent commonly used in nail polish removers. While effective in breaking down adhesives, prolonged exposure causes dryness, irritation, and inflammation. Applying petroleum jelly helps create a protective barrier against dehydration.
According to Shari Lipner, food plastic wrap is preferable over aluminum foil, as it creates a tighter seal, improving acetone efficiency and preventing premature evaporation.
Step 3: Let Acetone Work for 10-15 Minutes
Once the nails are wrapped, wait for 10-15 minutes to allow the acetone to dissolve the glue properly.
This time frame is essential, as acetone needs to break down the adhesive without requiring excessive force during removal.
Step 4: Gently Remove the Fake Nails
After soaking, the fake nails should loosen and lift easily.
How to Remove Fake Nails Safely:
- Use a washcloth soaked in warm water.
- Gently rub it over your nails to remove any remaining glue.
- Avoid using metal tools or orange sticks, as they cause nail plate damage and white spots.
The American Academy of Dermatology (AAD) advises against using sharp tools for nail removal, as excessive scraping leads to nail thinning and brittleness. Instead, Dr. Shari Lipner recommends a soft washcloth to remove residue without harming the natural nails.
Step 5: Buff Your Nails
After removing the fake nails, buffing helps smooth the surface and eliminate any remaining adhesive.
Proper Buffing Technique:
- Use a fine-grit buffer.
- Apply light pressure to avoid thinning the nail plate.
- Buff in one direction rather than using a rough back-and-forth motion.
Over-buffing weakens the nail structure, making it prone to breakage and peeling.
Step 6: Apply Cuticle Oil to Restore Hydration
Acetone removes moisture from nails and skin, so rehydration is essential.
Why Cuticle Oil is Important:
- It strengthens the nail bed and promotes healthy nail growth.
- Increases circulation around the nail, supporting faster regeneration.
- Protects against trauma and prevents splitting or peeling.
According to Healthline, cuticle oil helps repair nail damage, prevents dryness, and enhances overall nail health.
How To Remove Fake Nails ( Acrylic & Gel ) Without Acetone
Removing fake nails without acetone can be challenging, but it’s possible with the right techniques. Here are two effective methods:
- Using Drill Method
- Using Acetone-Free Nail Polish Removers
Using Drill Method
Removing fake nails without acetone using a nail drill requires caution to prevent nail damage. Electric drills effectively file down acrylic or gel nails, but improper use leads to thinning, sensitivity, and lasting impairment.
Elizabeth Smith Beauty reports severe nail bed damage from incorrect drill usage. Using appropriate drill bits and controlled speeds minimizes risks. Nails Magazine highlights that high-vibration drills cause damage to both nails and technicians.
- For safe removal, start with a coarse-grit drill bit to thin out the acrylic layer, then switch to a finer grit to avoid excessive friction and heat buildup.
- Maintain low speed and light pressure to prevent over-filing.
- Recommended drills include low-vibration, adjustable-speed models for controlled filing.
- After removal, buff the natural nails to smooth the surface and apply cuticle oil to restore hydration.
- Strengthening treatments help repair any damage and prevent breakage.
- Professional handling ensures the safest results, but proper self-education is necessary if done at home.
Using Acetone Free Nail Polish Removers
You can also remove fake nails at home without using acetone by following the below given steps:
- Select an acetone-free remover that contains ethyl acetate or isopropyl alcohol, as these solvents effectively break down artificial nails while being gentler than acetone.
- Soak cotton pads in the remover until they are fully saturated.
- Place the soaked cotton pads on your nails and wrap them with aluminum foil or with food plastic wrap to prevent evaporation and enhance effectiveness.
- Let the remover sit for 10–15 minutes to allow it to soften the fake nails.
- Unwrap the nails and gently slide off the softened artificial nails using a wooden cuticle stick without forcing them.
- Buff the nails to remove any remaining residue, then apply cuticle oil and moisturizer to restore hydration and strengthen the nails.
Can Dish Soap and Dental Floss Remove Fake Nails?
Dish soap and dental floss remove fake nails under specific conditions, but their effectiveness remains limited. Dish soap contains surfactants and, in some formulations, alcohol denat., which acts as a solvent.
Warm water mixed with dish soap softens adhesives to some extent, but professional sources indicate that this method fails to dissolve strong nail adhesives effectively.
According to Allure, gentle alternatives like warm water and dish soap do not work for removing acrylic nails. The dental floss technique involves sliding floss under the nail to lift it, but Self highlights the risk of nail plate separation and severe nail damage.
Additionally, dish soap causes excessive dryness, weakening natural nails. This method lacks the ability to dissolve strong adhesives, often resulting in improper removal and potential nail injuries.
How Often Should You Fully Remove Acrylic Nails?
Acrylic nails should be fully removed every 4-6 weeks to allow the natural nails to recover. Continuous wear weakens the nail bed and increases the risk of damage, thinning, and infections.
After removal, allow nails to rest for at least a week before reapplying acrylics, using hydrating treatments to restore strength.
How Often Should You Fully Remove Gel Nails?
Gel nails should be fully removed every 2 to 3 weeks. This time frame allows for healthy nail growth without causing long-term damage. Allow your nails to rest for at least a week between gel applications, and treat your nails with nourishing oils to maintain strength and hydration.
After Removal Care Tips
Hydrate Nails and Cuticle:
Apply nourishing cuticle oil or vitamin E oil daily to restore moisture, prevent brittleness, and keep nails flexible, promoting overall nail health and strength after removal.
Trim and File Gently:
Use a fine-grit nail file to shape nails carefully, smoothing rough edges without excessive pressure, reducing the risk of peeling, splitting, or further nail damage after removal.
Strengthen with a Nail Hardener:
Apply a keratin-based nail serum or strengthening treatment to reinforce weakened nails, restore resilience, and protect against breakage while your natural nails recover from artificial enhancements.
Avoid Immediate Reapplication:
Allow nails to breathe and recover before applying new acrylics, gel polish, or press-ons, preventing excessive stress, thinning, and long-term weakening of the natural nail structure.
What is The Chemical Composition of Fake Nails
According to the United States Food and Drug Administration, fake nails are made from acrylic polymers like ethyl methacrylate and polymethyl methacrylate. While ethyl methacrylate is safer than methyl methacrylate, unreacted monomers can still cause allergic reactions, requiring careful application to prevent damage.
How to Apply Fake Nails At Home
Learning how to apply fake nails at home can be a convenient and cost-effective way to achieve salon-quality results. While the process may vary depending on the type of fake nails you use, the basics usually involve preparing your natural nails, selecting the right size, and applying adhesive carefully.
A clean surface and proper placement help ensure a secure fit and longer-lasting wear. With a little practice and the right tools, you can easily apply fake nails at home and enjoy beautiful, polished results.