
Published On: 23-08-2026
Cluster lashes can create a beautiful eye look, but removing them incorrectly can make the process uncomfortable and difficult.
The key to safer removal is understanding how lash adhesive works and using the right approach before trying to separate the clusters.
This guide explains different ways to remove cluster lashes, including remover-based methods, oil-based alternatives, warm water and steam techniques, and steps for cleaning leftover glue.
You will also learn how to avoid common removal mistakes, protect your natural lashes during the process, choose suitable lash remover options, and understand why removal time can vary.
Continue reading to discover a complete approach for removing cluster lashes with more control and care.
What Can You Use to Remove Cluster Lashes
You can use different products and methods to remove cluster lashes safely, depending on the type of adhesive and how strongly the lashes are attached.
- Cluster Lash Remover: A product designed to soften lash adhesive and make cluster removal easier.
- Oil-Based Removers: Coconut oil, olive oil, or oil-based makeup removers can help loosen some lash adhesives.
- Warm Water and Steam: Heat and moisture can help soften the adhesive bond before gentle removal.
- Lash-Safe Cleansing Products: Gentle cleansers can help remove leftover glue residue after taking off cluster lashes.
The right method depends on your lash glue type and the condition of your natural lashes. The goal is always to loosen the adhesive first instead of pulling the clusters away forcefully.
Prepare Your Eyes and Tools Before Removal
Preparing your eyes and tools before cluster lash removal creates a controlled environment that helps you complete the process more comfortably and carefully.
Clean hands reduce the transfer of oils, makeup residue, and impurities to the eye area during removal.
The required items, such as cluster lash remover, oil-based remover option, cotton pads, and clean tools, should be prepared before starting so the removal process does not become interrupted.
Good lighting allows you to clearly see the cluster lash base and adhesive area, which helps prevent unnecessary pulling on natural lashes.
Taking enough time during preparation also helps avoid rushed movements that may disturb the natural eyelashes or make the removal process less precise.
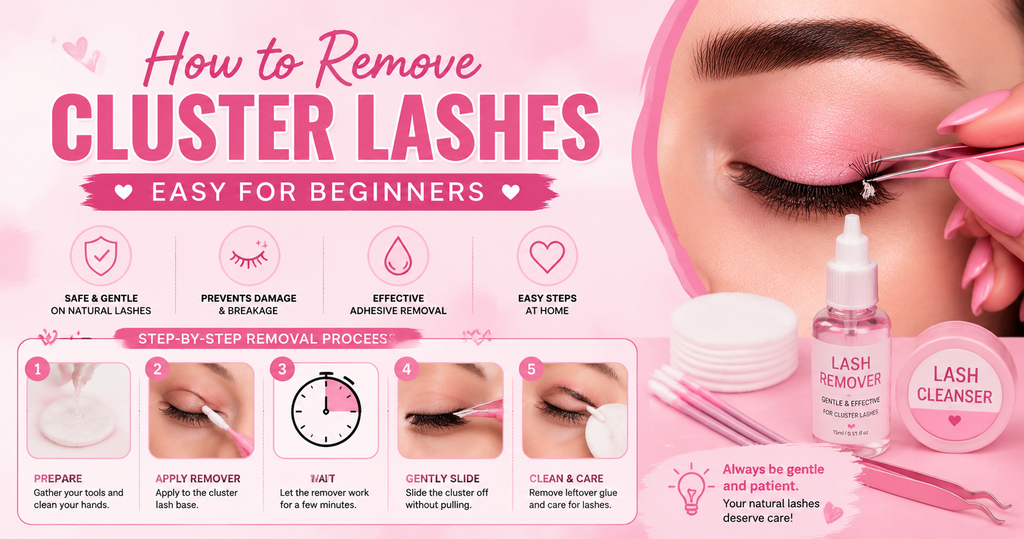
How to Remove Cluster Lashes With Remover
Yes, this section also needs the practical implementation layer. The current version explains the purpose and importance of applying remover, but the reader still needs to know how to apply it correctly.
Apply the Remover
Applying the remover correctly helps loosen the adhesive bond that connects the cluster lashes to your natural lashes, making the removal process more controlled and gentle.
A suitable lash adhesive remover should be applied directly to the cluster lash base where the glue has formed the strongest connection.
To apply the remover, place a small amount of lash adhesive remover on a clean applicator, cotton pad, or suitable removal tool. Carefully apply the product along the cluster lash base where the adhesive is attached to the natural lashes.
Avoid soaking the entire eye area because targeted application helps focus the product on the adhesive bond.
Allow the remover to sit for the recommended time so it can soften the glue before attempting to move the clusters.
Rushing this step or applying insufficient remover may leave the adhesive partially intact, which can make the clusters harder to remove and increase the need for pulling or pressure on natural lashes.
A properly applied remover creates a smoother transition to the next removal step.
The “Wait Game”
Allowing the remover enough time to work is a crucial step because the lash adhesive needs time to soften before the cluster lashes can be moved safely.
The remover works by breaking down the strength of the adhesive bond at the cluster lash base, which makes the attachment easier to release. The waiting time can vary depending on the type of lash adhesive used and the strength of the bond created during application.
During this stage, you should avoid pulling, rubbing, or testing the clusters before the adhesive has loosened properly.
Removing cluster lashes too quickly can leave hardened glue attached to the natural lashes, which may make the removal process more difficult and create unnecessary stress on the lash line.
A patient approach allows the remover to perform its intended function before the next removal step begins.
Gently Slide (Don’t Pull)
Gently sliding cluster lashes away from the natural lashes helps release the softened adhesive without creating unnecessary pressure on the lash line.
After the remover has weakened the bond, the cluster base should move more easily along the natural lash direction instead of requiring force.
To remove the cluster lashes, hold the loosened lash cluster gently with clean tweezers or a lash applicator.
Start from the outer edge of the cluster and slowly slide it away from the natural lash line in the same direction as the lash growth.
Use small, controlled movements instead of pulling the cluster upward or away suddenly. If the cluster does not move easily, apply more remover and allow additional time for the adhesive to soften.
Forcing a cluster that is still attached can create tension on individual natural lashes and may cause discomfort during removal. A slow sliding technique allows the lash adhesive to release gradually while keeping the natural lash area more comfortable.
Clean the Residue
Cleaning the remaining adhesive residue after removing cluster lashes helps keep the natural lashes and eyelid area free from leftover glue buildup.
The lash adhesive residue should be removed gently because hardened glue around the natural lash line can create discomfort and make future lash applications more difficult.
To clean the remaining residue, start by checking the natural lash line for any visible adhesive left behind after removing the clusters.
Use a clean cotton pad, lint-free applicator, or suitable lash cleanser to gently wipe the attachment area.
Move the tool along the lash line with light pressure instead of rubbing repeatedly, as aggressive friction can irritate the delicate eye area.
If small glue spots remain, apply a suitable adhesive remover or oil-based product recommended for lash removal and allow it to soften the residue before wiping again.
After removing the leftover adhesive, check the lashes once more to ensure the lash base feels clean and free from buildup.
This final cleanup step creates a cleaner surface and completes the cluster lash removal process properly.
Read Here: How to Clean Cluster Lashes
Cleanse Your Lashes and Eyelids
Cleansing your lashes and eyelids after cluster lash removal helps remove leftover adhesive, remover residue, and buildup from the eye area. A clean lash line allows the natural lashes to return to a cleaner condition after the removal process.
Start by gently washing the eyelid area and natural lashes with a mild, lash-friendly cleanser to remove any remaining product residue. Use clean fingertips or a soft applicator to apply the cleanser around the lash line without rubbing aggressively.
Rinse the area carefully and pat the lashes dry with a clean towel or tissue. Check the natural lash line after cleansing to ensure no visible glue particles or product residue remain.
Skipping this cleansing step may leave unwanted buildup around the lashes, which can affect comfort and lash hygiene after removal.
A gentle cleansing routine completes the removal process and prepares the natural lashes for aftercare.
Nourish and Strengthen Your Natural Lashes
Nourishing your natural lashes after removing cluster lashes helps maintain a healthy lash base before applying any new extensions or clusters.
The removal process can leave natural lashes exposed after adhesive and products have been used, so gentle aftercare supports lash comfort and cleanliness.
Apply a suitable lash conditioning product or lightweight lash oil around the lash area according to the product instructions.
Avoid applying heavy products directly onto the lash line because excess oils can create buildup and affect future lash applications.
Allow your natural lashes time to recover before adding another set of cluster lashes. Regular gentle care helps keep lashes looking healthier and prepares them for future styling.
Skipping aftercare may leave lashes feeling dry or neglected after removal.
Best Cluster Lash Remover Options
Cluster Lash Remover With Gentle Formula
A gentle formula lash remover helps loosen cluster lash adhesive while reducing unnecessary stress on the natural lash area.
The remover formula should focus on breaking down the adhesive bond gradually instead of creating a harsh removal process.
A suitable lash remover with mild ingredients can be more comfortable around the sensitive eye area when it is used correctly.
The product application should follow the recommended usage time because insufficient contact time may leave adhesive partially attached.
A gentle formula creates a more controlled removal experience by allowing the lash clusters to release with less pulling and pressure on natural lashes.
Cluster Lash Remover With Fast Adhesive Breakdown
A fast adhesive breakdown formula helps dissolve the bond between cluster lash adhesive and natural lashes in a shorter and more controlled manner.
The remover should work on the adhesive layer instead of requiring physical force to separate the lash clusters.
A suitable lash remover can reduce the time needed for the adhesive to soften when the product is applied correctly to the attachment area.
The user should follow the recommended application time because removing clusters before the adhesive weakens can increase pulling and stress on natural lashes.
A faster breakdown process improves removal efficiency while maintaining a gentle approach toward the natural lash line.
Cluster Lash Remover With Conditioning Ingredients
Conditioning ingredients in cluster lash removers can help create a more comfortable removal experience by supporting the condition of natural lashes during the process.
The remover formula should balance adhesive breakdown with gentle care because strong removal action alone can increase dryness around the lash area.
Ingredients designed for conditioning can help maintain the softness of natural lashes while the adhesive loosens from the lash base.
The product should still be applied carefully because nourishing components do not replace proper removal technique.
A well-formulated cluster lash remover supports both effective adhesive removal and better aftercare for natural lashes.
Can You Remove Cluster Lashes Without a Lash Remover
Yes, cluster lashes can sometimes be loosened without a dedicated lash remover, but the removal process depends on the type and strength of the adhesive used during application.
Alternative methods focus on softening the lash bond gradually so the clusters can release with minimal pressure.
Warm water, steam, and oil-based products may help weaken some adhesive residue, but they should not replace careful removal techniques.
The clusters should never be pulled forcefully because a strong adhesive bond can create tension on natural lashes.
A gentle approach allows the adhesive to loosen before the clusters are moved. If the lash bond remains firm, a suitable lash remover may provide a more controlled option.
How to Remove Cluster Lashes Without Remover
Use Warm Water and Steam
Warm water and steam can help loosen some cluster lash adhesives by softening the bond that holds the lash clusters to the natural lashes.
This method works by creating gentle warmth around the lash attachment area, which may make the adhesive easier to release without applying unnecessary force.
To use this technique, prepare warm water or a warm damp towel and place it over closed eyes for a few minutes to allow the heat to reach the lash base.
The clusters should only be removed when they begin to slide easily from the natural lashes. If the lashes still feel firmly attached, repeat the softening process instead of pulling them away.
Removing cluster lashes before the adhesive loosens can create tension on natural lashes and make the removal process uncomfortable.
A slow and gentle approach helps protect the natural lash line while reducing leftover adhesive buildup.
Use Coconut Oil or Olive Oil
Coconut oil and olive oil are commonly used as alternative methods for loosening cluster lash adhesive when a dedicated lash remover is not available.
These oil-based products may help soften some adhesive residue by reducing the grip between the lash cluster and the natural lash area. The goal of using oil is to weaken the bond gradually rather than force the clusters away while the adhesive is still firm.
To use this method, apply a small amount of coconut oil or olive oil around the lash base with a clean cotton swab or applicator and allow it to sit for a few minutes.
Once the adhesive begins to soften, gently slide the clusters away following the natural lash direction.
Avoid applying excessive oil or rubbing the lash line aggressively because leftover oil buildup can make the area difficult to clean and may irritate the delicate eye area.
Cleanse the lashes afterward to remove remaining oil and adhesive residue.
Warm Water and Baby Shampoo
Warm water and baby shampoo can help clean the lash area while loosening some leftover adhesive residue after cluster lashes have been softened.
This method focuses more on gentle cleansing rather than directly dissolving strong lash glue, so it works best when the adhesive has already started to weaken.
To use this method, mix a small amount of gentle baby shampoo with warm water and apply the solution carefully around the lash line using a clean cotton pad or soft applicator.
Allow the solution to sit briefly so it can help loosen surface residue before gently wiping the area.
Avoid rubbing the lash line aggressively because excessive friction can irritate the delicate eyelid area and pull on natural lashes.
After the clusters become easier to remove, slide them away gently and cleanse the lashes again to remove any remaining shampoo or adhesive residue.
This approach helps maintain a cleaner lash base while avoiding unnecessary pressure during removal.
Use a Soft, Clean Brush to Loosen Adhesive
A soft, clean brush can help remove loosened adhesive residue and separate cluster lash fibers after the lash bond has already started to weaken.
This method works by using gentle brushing movements to lift softened glue particles instead of applying pressure directly to the natural lash line.
A clean spoolie brush can be moved carefully through the lashes in the direction of natural lash growth after using warm water, oil, or another softening method.
The brush should only be used when the adhesive has become flexible because brushing against a strong bond can create unnecessary pulling on natural lashes.
Avoid aggressive scrubbing or repeated brushing because excessive friction may irritate the eyelid area and disturb the natural lashes.
A gentle brushing technique helps remove remaining residue and prepares the lash area for final cleansing after cluster lash removal.
Oil-Based Makeup Remover
Oil-based makeup remover can help loosen remaining lash adhesive by breaking down makeup, oils, and some types of lash glue residue around the lash line.
The product should be applied carefully because the goal is to soften leftover adhesive rather than rub the natural lashes aggressively.
A clean cotton pad can be saturated with an oil-based makeup remover and placed gently over the lash area for a short period to allow the formula to work.
The softened residue can then be wiped away using light downward movements along the direction of natural lash growth.
The cotton pad should not be dragged repeatedly across the eyelid because excessive friction may irritate the sensitive eye area.
A clean spoolie brush can help remove loosened residue from the lashes after the adhesive becomes softer.
Oil-based makeup remover works best as a gentle cleanup step when small glue traces remain after cluster lash removal.
Gently Slide Loose Clusters Away
Gently sliding loose cluster lashes away helps remove the softened lash bond without creating unnecessary pressure on the natural lash line.
After warm water, steam, oil, or another softening method has reduced the adhesive strength, the clusters should begin to move more freely from the natural lashes.
Start from an area where the cluster feels already loosened and carefully slide the lash cluster in the same direction as natural lash growth.
Avoid pulling the clusters upward or removing them quickly because the remaining adhesive can create tension on individual natural lashes. If the cluster does not move easily, the adhesive may need more time to soften before removal.
A controlled sliding motion allows the lash bond to release gradually and helps protect the natural lashes during the removal process.
How to Remove Lash Cluster Glue
Wash Your Hands First
Washing your hands before removing lash cluster glue creates a cleaner and safer removal process by reducing the chance of transferring dirt, oils, or bacteria to the delicate eye area.
Clean hands also improve control when handling lash remover, cotton pads, or small tools near the natural lash line. Before starting the glue removal process, wash your hands thoroughly with mild soap and clean water.
Dry your hands completely with a clean towel because moisture can make tools harder to hold and control. Avoid touching other surfaces after washing your hands to maintain cleanliness.
This preparation step helps create a more hygienic environment and allows you to remove leftover lash adhesive with better precision while minimizing unnecessary contact with the eyelid area.
Soften the Glue With Steam
Softening the lash cluster glue with steam helps loosen the adhesive bond before attempting to remove any remaining residue from the natural lashes.
The gentle warmth from steam can help make hardened glue more flexible, which reduces the need for rubbing or pulling around the sensitive lash line.
Steam should be used carefully because excessive heat or direct exposure can irritate the delicate eye area.
To soften the glue, follow these steps:
- Prepare warm water and create gentle steam by using a bowl of warm water or taking a warm shower.
- Keep your face at a comfortable distance from the steam to avoid excessive heat around the eyes.
- Allow the steam to reach the lash area for a few minutes so the adhesive can become softer.
- Check whether the glue feels less stiff before moving to the next removal step.
- Avoid trying to scrape or pull the adhesive while it is still hard because forceful removal can place unnecessary stress on the natural lashes.
Steam works as a preparation step that makes the adhesive easier to manage before applying a lash remover, oil-based product, or other gentle cleaning method.
The goal is to soften the glue first so the remaining residue can be removed with controlled movements instead of force.
Apply a Lash Glue Remover or Oil
Applying a lash glue remover or oil-based product helps soften the remaining adhesive so the residue can be removed without unnecessary pulling or rubbing.
The product should target the areas where lash cluster glue has hardened around the natural lash line.
The purpose of this step is to weaken the adhesive bond and make the glue easier to lift away.
Apply a small amount of lash glue remover or a suitable oil-based product to a clean cotton swab or applicator.
Gently place the product over the areas where glue residue remains, avoiding excessive contact with the eye itself.
Allow the product enough time to soften the adhesive because removing the glue too quickly can require more pressure and increase friction on the natural lashes.
After the adhesive becomes softer, the loosened residue can be removed with gentle movements.
A cotton swab works well for targeting small glue spots, while a clean spoolie can help separate residue from individual lashes.
Avoid applying too much product at once because excess oil or remover can make the cleaning process harder and may leave unwanted buildup around the lash line.
The goal is to break down the glue gradually while keeping the natural lashes clean and comfortable.
Allow the Product to Break Down the Adhesive
Allowing the lash glue remover or oil-based product enough time to work is an important step because the adhesive needs time to soften before it can be removed safely.
Lash cluster glue becomes easier to lift when the product reaches the bonded areas instead of being wiped away immediately after application.
Apply the remover or oil-based product to the glue residue and allow it to sit for the recommended amount of time based on the product instructions.
Keep the eyes relaxed during this process and avoid rubbing the lash line while the adhesive is breaking down. The waiting period gives the formula time to weaken the glue connection, which reduces the need for pressure during removal.
Check the adhesive after waiting to see whether the residue has become softer or easier to move. If the glue still feels firm, allow additional time rather than scraping or pulling the residue away.
A slow breakdown process creates a gentler removal experience and helps protect the natural lashes from unnecessary friction.
Gently Slide Off the Lash Clusters
After the lash adhesive has softened, the remaining cluster lash glue should release with gentle movements instead of forceful pulling.
The softened bond allows the lash clusters or adhesive residue to move more easily, which helps reduce unnecessary tension on the natural lashes.
The removal motion should follow the direction of natural lash growth to avoid creating pressure at the lash roots.
Use a clean cotton swab, applicator, or your fingertips to gently slide the loosened cluster lash residue away from the natural lashes. Start from the area where the adhesive feels weakest and move slowly across the lash line.
Avoid pulling downward or removing dry glue because strong resistance can create discomfort and increase friction around the natural lashes.
If the adhesive still feels attached, stop the movement and apply more remover or oil-based product instead of forcing the residue away.
A gradual sliding technique allows the softened glue to separate more smoothly while keeping the natural lash area cleaner and more comfortable.
Clean Away Remaining Residue
Removing the remaining lash cluster glue residue helps create a cleaner lash line after the main adhesive bond has been softened and removed.
Small amounts of adhesive can stay attached near the natural lash roots, so the residue should be cleaned carefully instead of being scraped or pulled away.
Use a clean cotton swab or lint-free applicator with a suitable lash cleanser or remover to target the remaining glue spots.
Gently move the applicator along the lash line and focus on areas where adhesive buildup is visible.
A clean spoolie brush can help separate individual lashes and remove loosened residue without applying excessive pressure.
Check the lash line from different angles under good lighting to identify any leftover glue particles.
Avoid aggressive rubbing because repeated friction can irritate the eyelid area and disturb the natural lashes.
A careful cleanup step leaves the lash base smoother, cleaner, and better prepared for future lash applications.
Moisturize and Care for Natural Lashes
After removing cluster lashes and cleaning away adhesive residue, caring for the natural lashes helps maintain a healthier lash base before another application.
The removal process can leave the lash area feeling dry because cleansing products and adhesive removers may remove natural oils from the lash line.
Apply a lightweight lash-safe conditioning product or a small amount of suitable lash serum to the natural lashes after the area has been cleaned completely.
A clean applicator can help distribute the product evenly without creating buildup around the eyelids.
Avoid applying heavy oils or thick products near the lash roots because excess residue can interfere with future lash adhesive performance.
Allow the natural lashes to rest and recover before applying a new set of cluster lashes. Gentle aftercare helps keep the lash fibers flexible, supports a cleaner lash environment, and prepares the natural lashes for future styling.
Tips for Preventing Lash Damage During Removal
Be Gentle and Take Your Time
Removing cluster lashes requires patience because the adhesive bond needs enough time to loosen before the clusters can separate from natural lashes.
Rushing the removal process can create unnecessary tension on individual lashes when the adhesive is still holding the cluster firmly.
A slow removal approach allows the lash bond to release gradually and reduces the need for pulling or applying pressure.
The removal process should focus on controlled movements instead of speed because gentle handling helps protect the natural lash line during each step.
Taking extra time during removal creates a safer process and helps maintain the condition of natural lashes for future lash applications.
Avoid Pulling Stubborn Clusters
Stubborn cluster lashes should never be removed by force because the adhesive may still be strongly attached to the natural lashes.
Pulling a resistant cluster can place unnecessary tension on individual lash fibers and create discomfort around the lash line.
The removal process should focus on softening the adhesive further when a cluster does not release easily.
A lash remover, oil-based product, or additional waiting time can help weaken the remaining bond before another attempt is made.
Gentle handling protects the natural lashes by allowing the adhesive to loosen gradually instead of using pressure to detach the cluster.
Clean Your Lashes After Removal
Cleaning natural lashes after cluster lash removal helps remove any remaining adhesive particles and product residue from the lash line.
The lash line should be cleaned gently because leftover glue can create buildup around natural lashes and affect future lash applications.
A gentle lash cleanser or oil-free cleansing product can help remove residue without excessive rubbing around the delicate eye area.
The natural lashes should be checked carefully after cleaning because small adhesive traces may remain near the previous attachment points.
A proper cleansing step leaves the lash base cleaner and helps maintain a healthier surface before applying new cluster lashes.
Hydrate and Nourish Your Lashes
Hydrating natural lashes after cluster lash removal helps maintain a clean and comfortable lash condition before the next application.
The removal process can leave the lash area feeling dry because cleansing products and adhesive removal methods may remove natural oils around the lashes.
A gentle lash-safe conditioning product can help support the softness of natural lashes without creating heavy buildup near the lash line.
The lash area should remain clean before applying any nourishing product because residue can reduce product contact with the natural lashes.
Regular aftercare allows the natural lashes to stay in better condition and prepares them for future cluster lash applications.
Mistakes to Avoid When Removing Lash Cluster Glue
Pulling Off Clusters Dry
Removing cluster lashes while the adhesive is still dry and firmly attached can create unnecessary tension on the natural lash line.
The dry adhesive bond can make the cluster harder to separate because the lash fibers remain connected through the hardened glue layer.
The removal process should soften the adhesive first because loosened glue allows the cluster lashes to release with less pressure.
Pulling dry clusters can make the removal process uncomfortable and may disturb the natural lashes attached near the adhesive area.
A controlled removal method protects the lash line by allowing the adhesive to weaken before the clusters are removed.
Using Harsh Chemicals
Using harsh chemicals around the eye area can create an unsuitable removal environment because the eyelid and natural lashes require gentle handling.
Strong products that are not designed for lash adhesive removal may irritate the surrounding skin or make the removal process more difficult to control.
A suitable cluster lash remover should be selected based on its intended use because the formula needs to break down adhesive without unnecessary exposure to unsuitable ingredients.
The removal process becomes safer when the product matches the sensitivity of the eye area and the type of adhesive being removed.
Scrubbing Aggressively
Scrubbing the lash line aggressively after cluster lash removal can place unnecessary friction on the delicate eye area.
The remaining adhesive residue should be removed with controlled movements because excessive rubbing can make the cleansing process uncomfortable.
A gentle cleansing method allows the remover or cleanser to lift residue gradually without applying strong pressure to natural lashes.
Careful cleaning helps maintain a smoother lash base while reducing unnecessary stress during the aftercare stage.
Removing Adhesive Too Forcefully
Removing lash adhesive too forcefully can make the cleanup process harder because hardened glue may still be attached to individual natural lashes.
The adhesive residue should be softened before removal because softened glue can be lifted more easily than a rigid adhesive layer.
A gentle tool, suitable cleanser, or proper remover can help loosen remaining glue without aggressive scraping or pulling.
Controlled adhesive removal creates a cleaner lash surface while supporting a more comfortable recovery process.
Skipping Aftercare
Skipping aftercare after removing cluster lash glue can leave the natural lash area without proper cleaning and maintenance.
The removal process may leave small amounts of residue that need attention before the next lash application.
A simple aftercare routine with gentle cleansing and suitable lash care products helps maintain a cleaner lash base.
Natural lashes benefit from proper care because consistent maintenance supports better preparation for future cluster lash use.
How Long Should Lash Glue Removal Take
The time required to remove cluster lash glue depends on the adhesive condition and the removal approach.
A gentle removal process may take several minutes because the adhesive needs enough time to soften before the clusters can be released safely.
Rushing the process can increase the chance of pulling against the natural lashes or leaving behind adhesive residue.
The removal time should be based on how easily the glue loosens rather than using force to speed up the process.
Why Removal Time Can Vary
The removal time for cluster lash glue changes because different adhesive conditions require different levels of softening and cleanup.
Stronger bonds usually need more time because the remover or oil must gradually weaken the adhesive layer.
The amount of glue applied during lash installation also affects removal because thicker adhesive layers take longer to break down.
The length of time the lashes have been worn can influence the process because older adhesive may become harder or more resistant.
The chosen removal method affects the overall duration because gentle methods require patience while protecting the natural lash line.
Conclusion
Removing cluster lashes safely requires patience, the right products, and gentle handling throughout the process.
Softening the adhesive before removal helps reduce unnecessary pulling and makes the clusters easier to release.
This guide covered multiple removal methods, including lash removers, oil-based options, warm water, steam, and glue-cleaning techniques.
It also explained common mistakes that can affect the natural lash area and shared tips for maintaining lash condition after removal.
Choosing the right approach depends on adhesive strength, removal method, and the condition of the lashes.
A careful removal routine creates a cleaner experience and helps prepare natural lashes for future cluster lash applications.