Published On: 14 Mar 2026
Eyelash extensions are a popular beauty treatment that enhances the length, volume, and overall appearance of natural lashes. However, achieving a natural and long-lasting result requires more than simply attaching extensions to the lashes.
The process involves careful preparation, proper technique, and attention to detail at every step. From selecting the right type and style of lashes to applying them with precision, each stage plays an important role in the final outcome.
Skipping small steps or rushing the procedure can affect both the appearance and durability of the extensions. Therefore, following a structured and professional method is essential for safe and effective application.
In this step-by-step guide, you will learn how to apply eyelash extensions correctly so the results look balanced, neat, and long-lasting.
1. Collect the Items Required to Apply Eyelash Extension
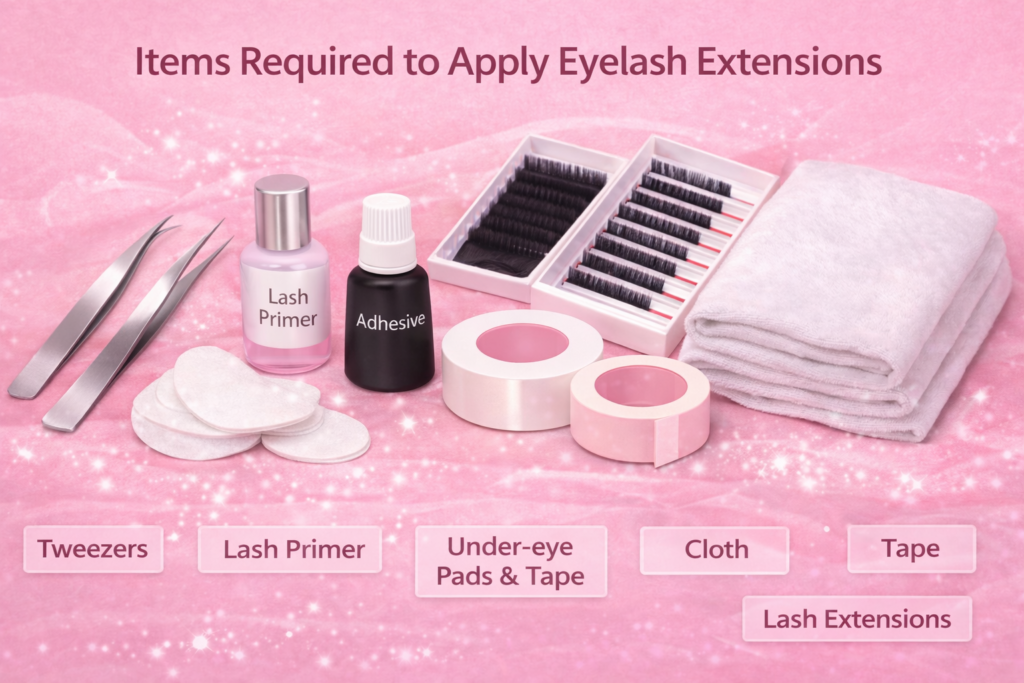
Applying eyelash extensions requires careful preparation and the right tools to ensure safety, precision, and long-lasting results. Before starting the application process, it’s important to gather all the necessary items so the procedure goes smoothly and efficiently. Following are the required items:
- Tweezers
- Lash primer
- Under-eye pads and tape
- A cloth to cover the forehead and eyebrows
- Tape
- Lash extensions
- Adhesive
2. Prepare Lashes for Eyelash Extension Treatment
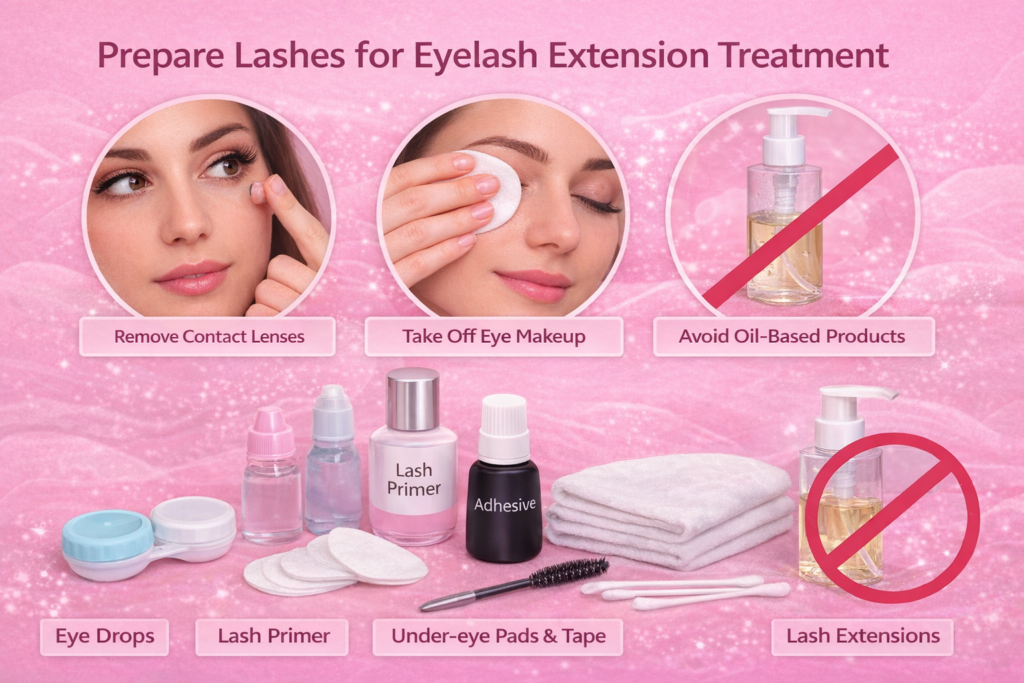
Before you start applying eyelash extensions, it is important to make sure the natural lashes are properly prepared for the treatment.
Proper preparation means the client removes contact lenses, takes off all eye makeup, and avoids using oil-based products near the eyes before the appointment. This step is essential because clean, dry lashes allow the extensions to attach more easily and help the adhesive bond more effectively.
Studies also show that oil exposure, excessive moisture, and friction can weaken cyanoacrylate-based adhesives, which are commonly used in eyelash extension glue. Because of this, preparing the lashes correctly not only makes the application process smoother but also helps the extensions last longer.
If you want a complete guide on this step, read our in-depth article on how to prepare for eyelash extensions
3. Choose the Suitable Eyelash Extension Type
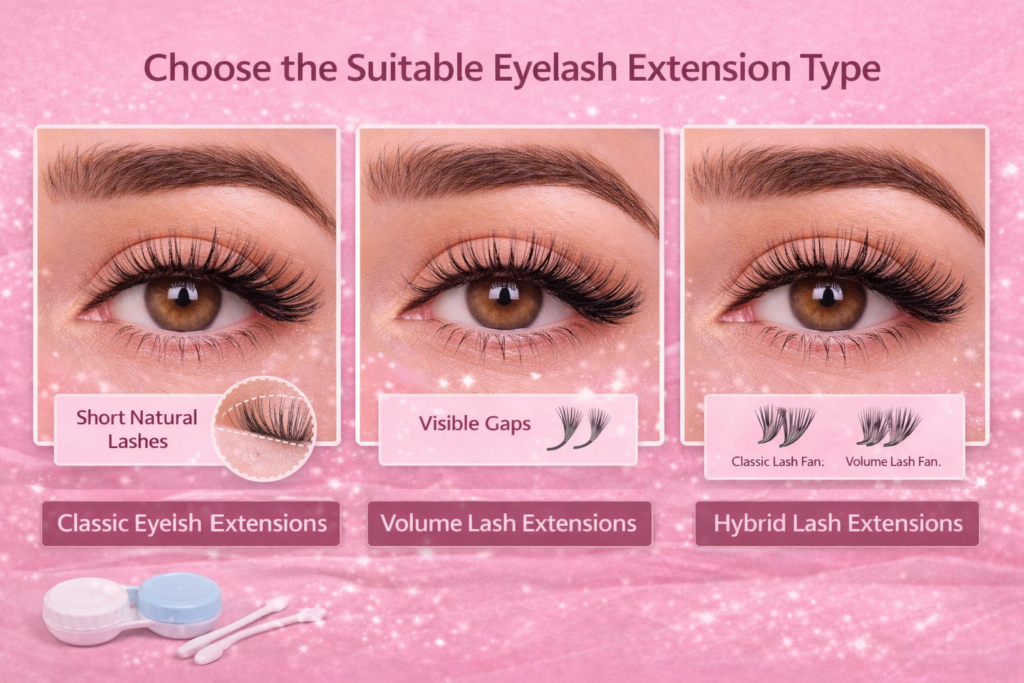
Before starting the eyelash extension application, it is important to choose the most suitable type of lash extension for your client. The right choice depends on the condition and natural pattern of the client’s lashes.
If the natural lashes are short and the client wants to increase length, classic eyelash extensions are usually the best option. If the lashes have normal length but contain visible gaps, volume lash extensions are more suitable because they help fill those spaces. If the client has both short lashes and noticeable gaps, hybrid lash extensions can provide a balanced result by combining classic and volume techniques.
However, you should always examine the client’s natural lashes carefully and discuss their expectations before making a decision.
A balanced approach is important. For example, if you choose classic lash extensions, you should select a suitable lash length that matches the client’s natural lashes. Avoid choosing extensions that are too long because research says that extremely long or extremely short extensions can both create an unnatural look.
4. Select the Best Eyelash Extension Style
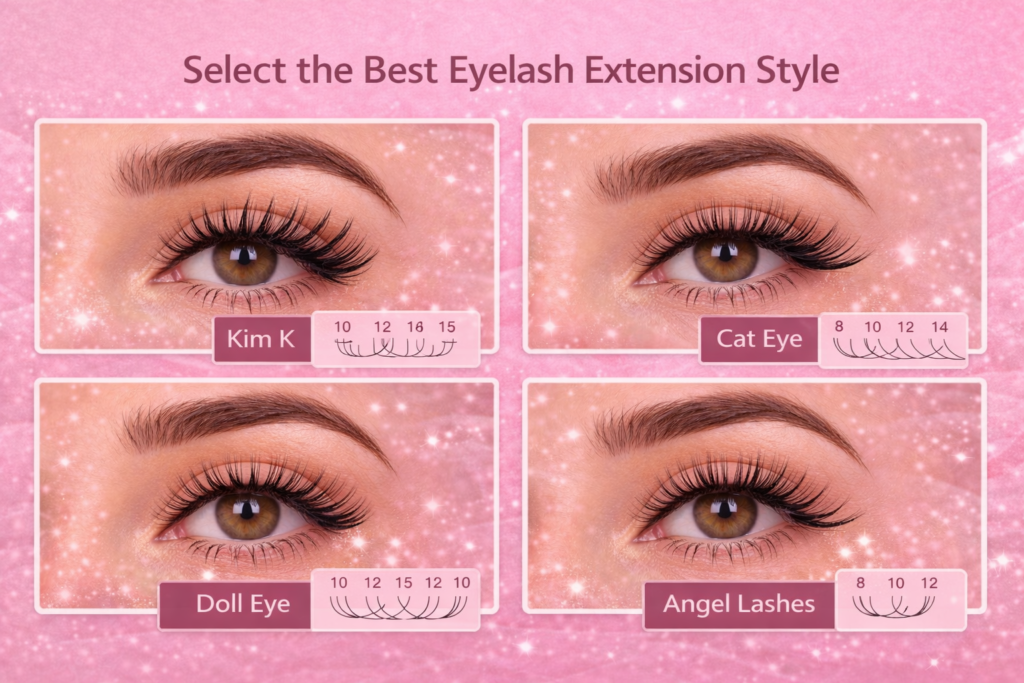
After selecting the type of eyelash extensions, choosing the right eyelash extension style is equally important. Lash style usually refers to lash mapping, which means deciding how different lengths and thicknesses of lashes will be placed across the eyelid.
The pattern you create through this mapping determines the final look of the lashes. For example, if you apply shorter lashes on the inner and outer corners and place longer lashes in the center, the result will create one specific style.
On the other hand, if you place short lashes at the inner corner and gradually increase the length toward the outer corner, the final appearance will be different. Many eyelash extension styles are available, including Kim K, Cat Eye, Doll Eye, and Angel Lashes.
However, you should always ask about the client’s preferences and evaluate their eye shape before choosing the most suitable lash style.
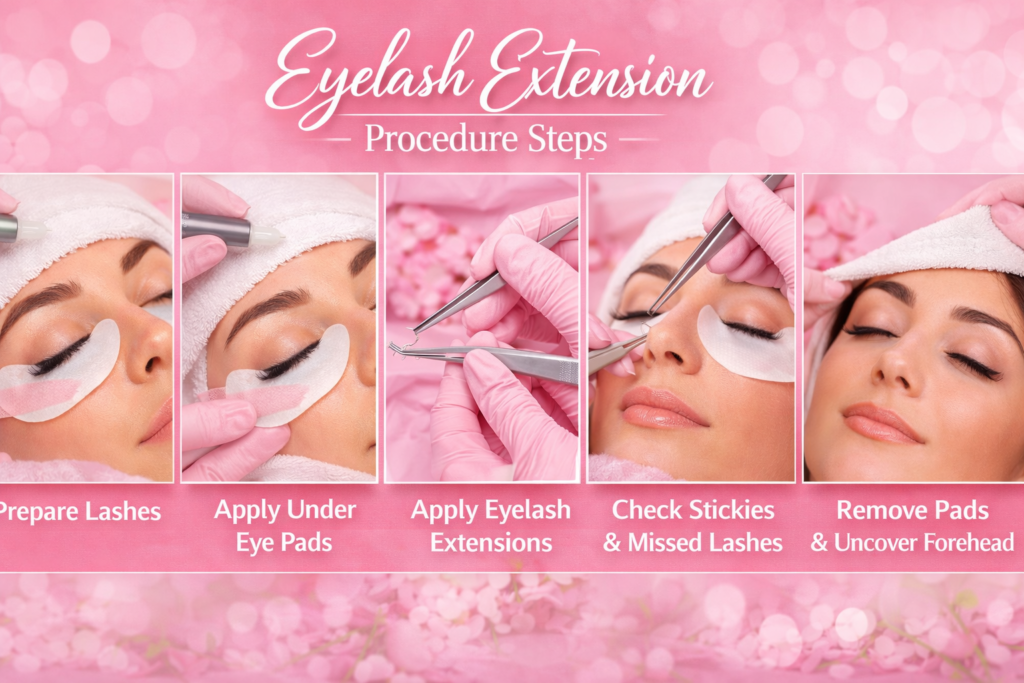
5. Apply the Under Eye Pads & Tape
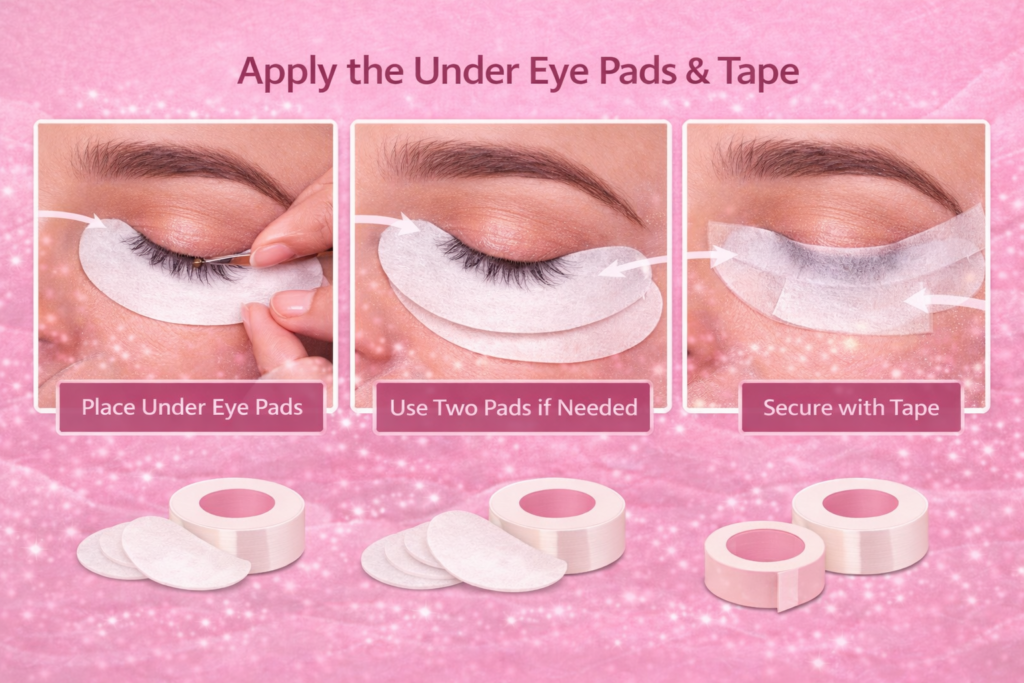
Applying under-eye pads and tape is an essential step before starting eyelash extension application. This step protects the eyes and keeps the lower lashes separated during the procedure.
If you skip this step, the adhesive may come into contact with the eye area and cause irritation or discomfort. Small mistakes during the process should never be ignored because they can affect both the results and eye safety.
Research has also shown that up to 73% of women experienced ocular side effects after using artificial eyelashes or extensions, which highlights the importance of careful application.
To apply the pads, place them directly under the lower lash line and ensure all lower lashes remain under the pad. Since one pad may not cover the entire curved eye area, you can use two pads to cover the full lower lash line. After placing the pads correctly, apply tape over them to secure them in place.
6. Cover Eyebrow and Forehead
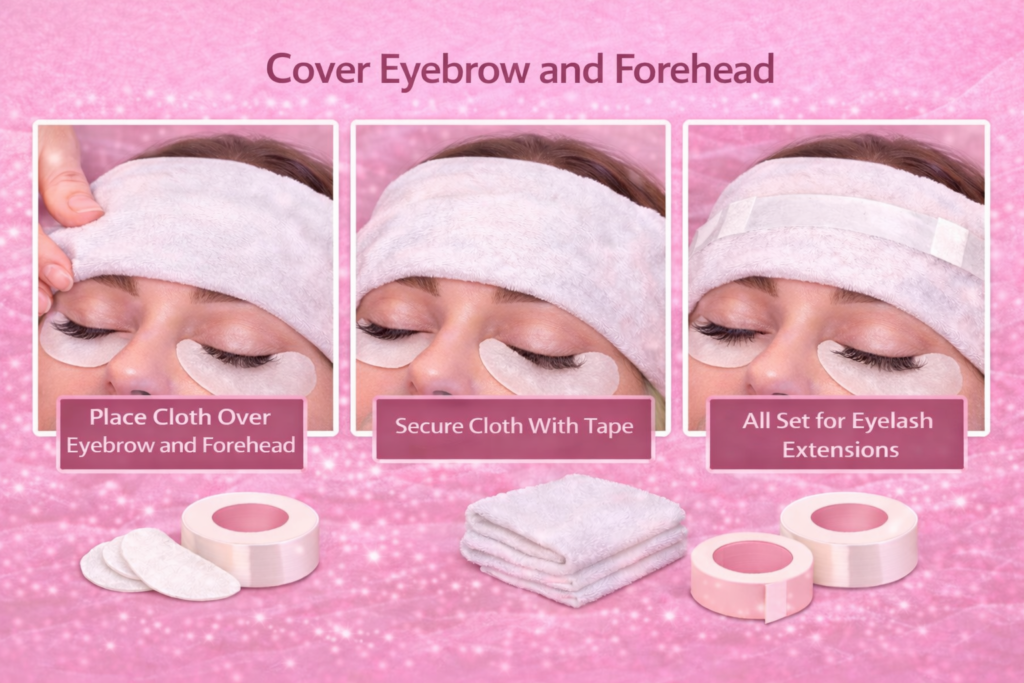
Covering the client’s eyebrows and forehead is another important step during eyelash extension application. While working close to the eyes, your hands may accidentally touch the client’s forehead or eyebrow area.
In addition, there is always a small chance that adhesive or a lash extension could drop during the application process. If this happens, the adhesive may land on the forehead or stick to the eyebrows, which can create discomfort for the client and interrupt the procedure.
To prevent this situation, it is best to cover the area from the eyebrows to the forehead with a clean cloth. This simple step helps keep the working area clean and protects the client’s skin and hair.
After placing the cloth on forehead and eyebrow, secure it with tape so it stays in place and does not move during the procedure.
7. Apply the Lash Primer
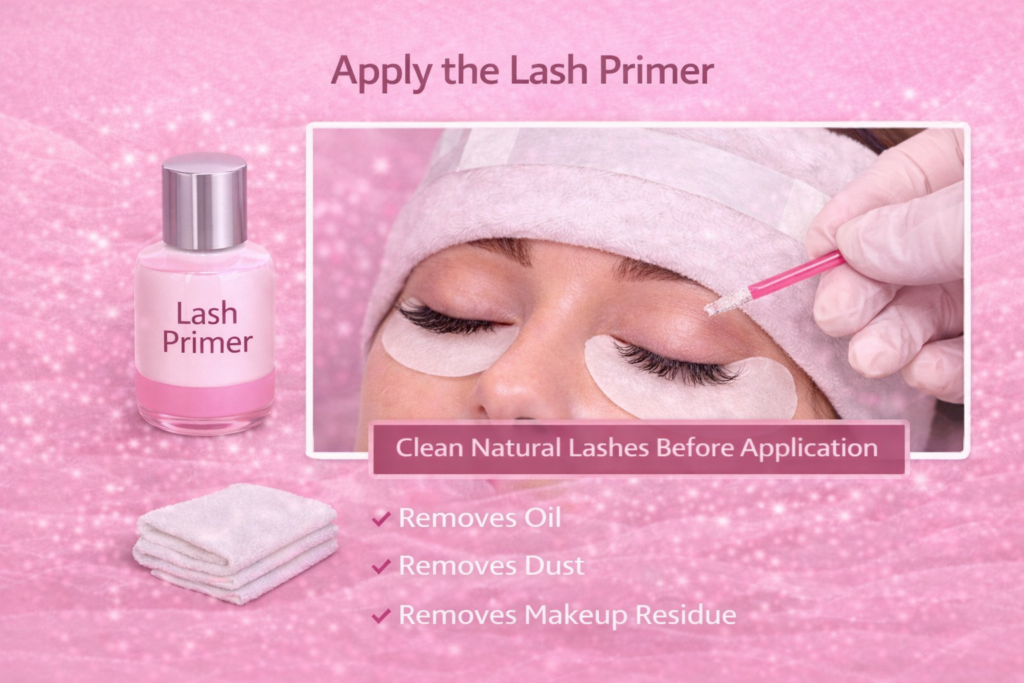
Applying a lash primer is an important step before starting the eyelash extension application. A lash primer is a cleansing solution that removes leftover oil, dust, and makeup residue from the natural lashes.
Clean lashes are necessary because even a small amount of oil or dirt can weaken the bond between the extension and the natural lash. Lash primer is a must for lash extensions because study says that it creates an ideal surface for the glue to bond with your natural lashes.
When the lashes are properly cleaned and prepared, the adhesive attaches more effectively and the extensions stay in place longer. For this reason, applying primer helps improve both the application process and the durability of the eyelash extensions.
8. Apply the Eyelash Extensions
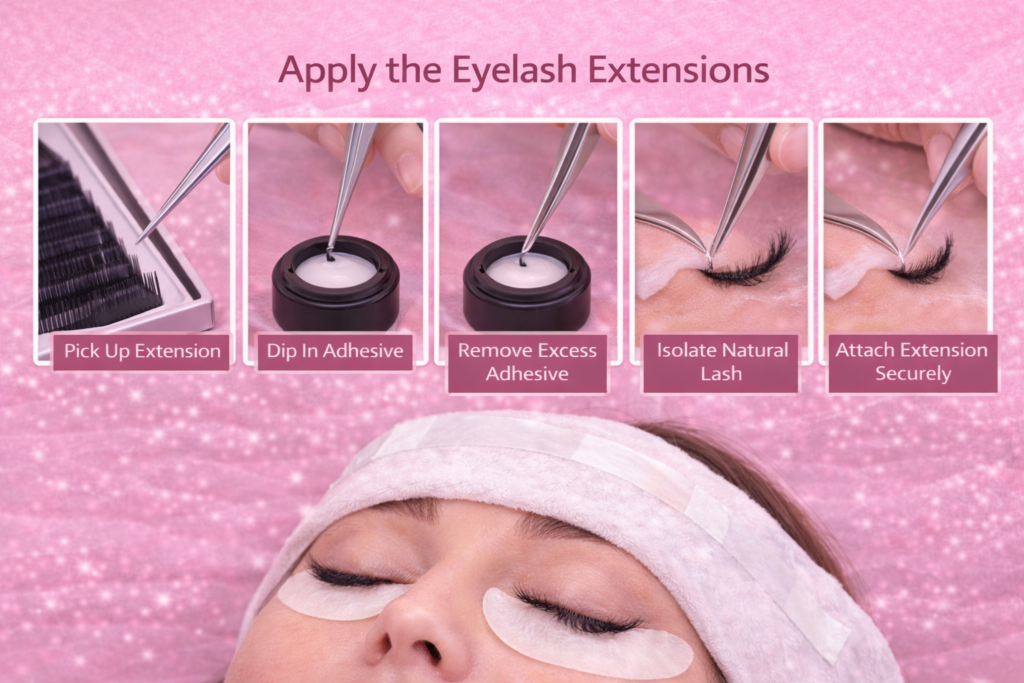
This is one of the most important and critical steps in the eyelash extension application process. At this stage, the lash type and style have already been selected, and all preparation steps have been completed, so you can begin the actual application.
First, pick up a single lash extension using a tweezer and hold it slightly above the middle of the extension for better control.
Next, dip the lower part of the lash extension into the adhesive for a second so a small amount of glue coats the base.
Then gently remove any excess adhesive by lightly touching the extension to the edge of the adhesive container.
After that, carefully isolate one natural lash of the client using another tweezer so nearby lashes remain separated.
Once the natural lash is isolated, place the extension about 1–2 mm above the base of the natural lash and hold it steady for a few seconds so the adhesive can bond.
When the extension is securely attached, move on to the next natural lash and repeat the same process until all lash extensions are applied.
9. Let Lash Extensions Dry
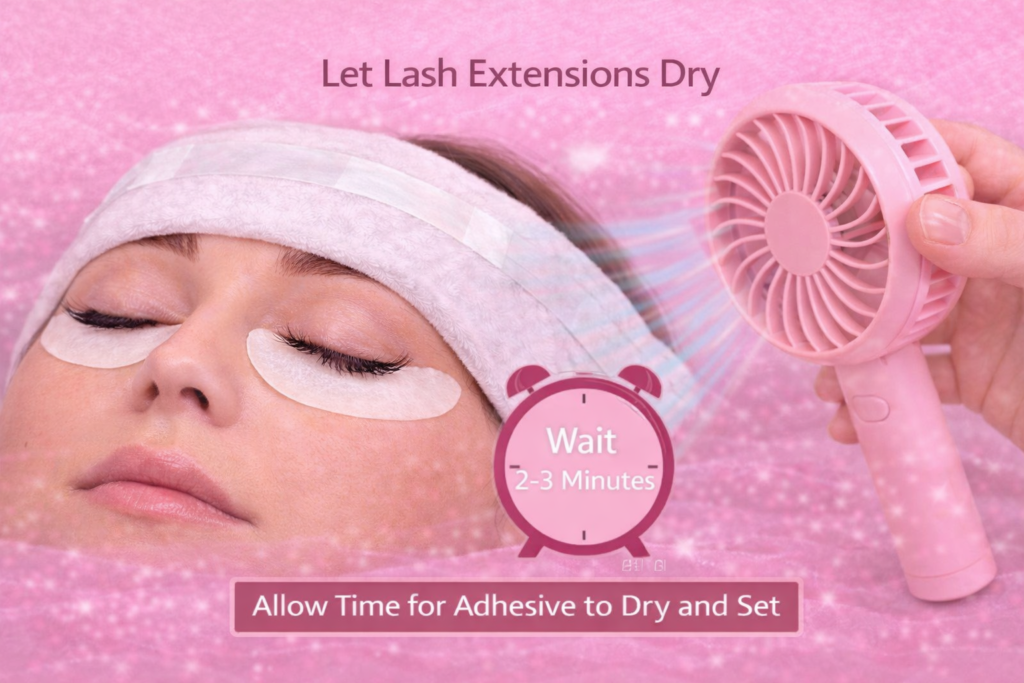
After all the lash extensions have been applied, it is important not to remove the eye pads or tape immediately. The adhesive needs a little time to dry properly so the bond between the natural lash and the extension becomes stable and strong. Research also emphasizes the importance of adhesive properties & drying time.
If you rush this step, the extensions may shift or loosen before the adhesive fully sets. Therefore, allow the client to keep their eyes closed for a few minutes so the glue can dry safely.
This waiting time helps the adhesive cure and ensures that the extensions stay securely attached.
10. Check Lash Stickies
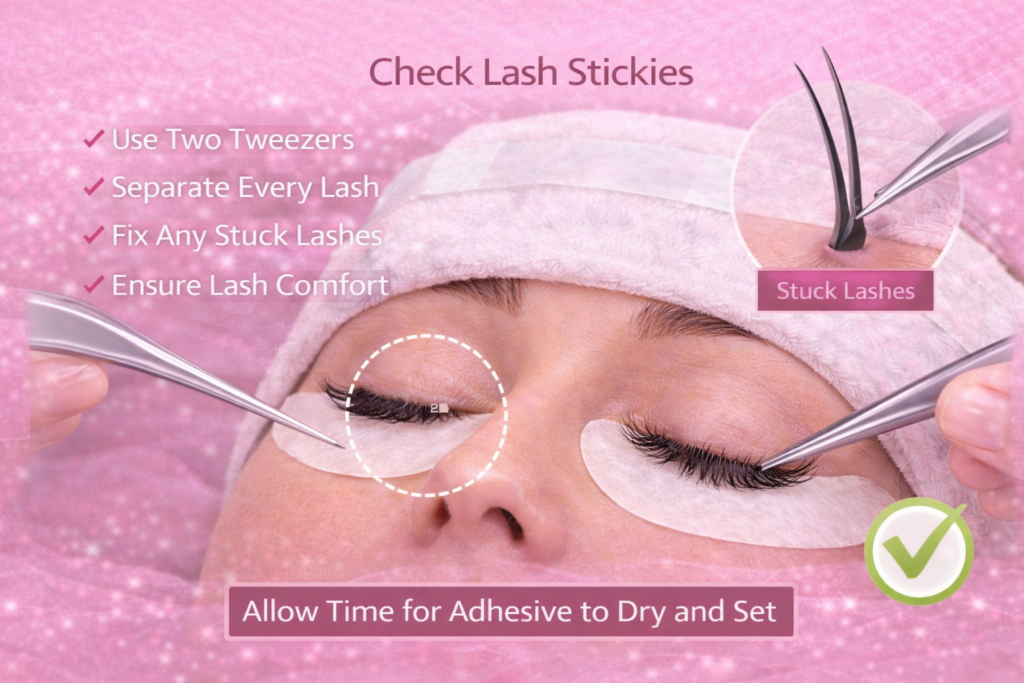
After the adhesive has dried, the next step is to check for lash stickies. Lash stickies happen when two or more natural lashes accidentally get bonded together with the adhesive during the extension application.
This usually occurs when nearby lashes touch the wet adhesive before it fully dries. Lash stickies should be fixed immediately because they can cause discomfort and may affect the natural lash growth cycle.
To check for stickies, gently go through the lashes using two tweezers and carefully separate each extension from the surrounding lashes. Move slowly across the lash line so you can inspect every section properly.
If you find any lashes stuck together, gently separate them with the tweezers until each natural lash moves freely. This step ensures the extensions look neat and remain comfortable for the client.
11. Check If Any Lash is Missed
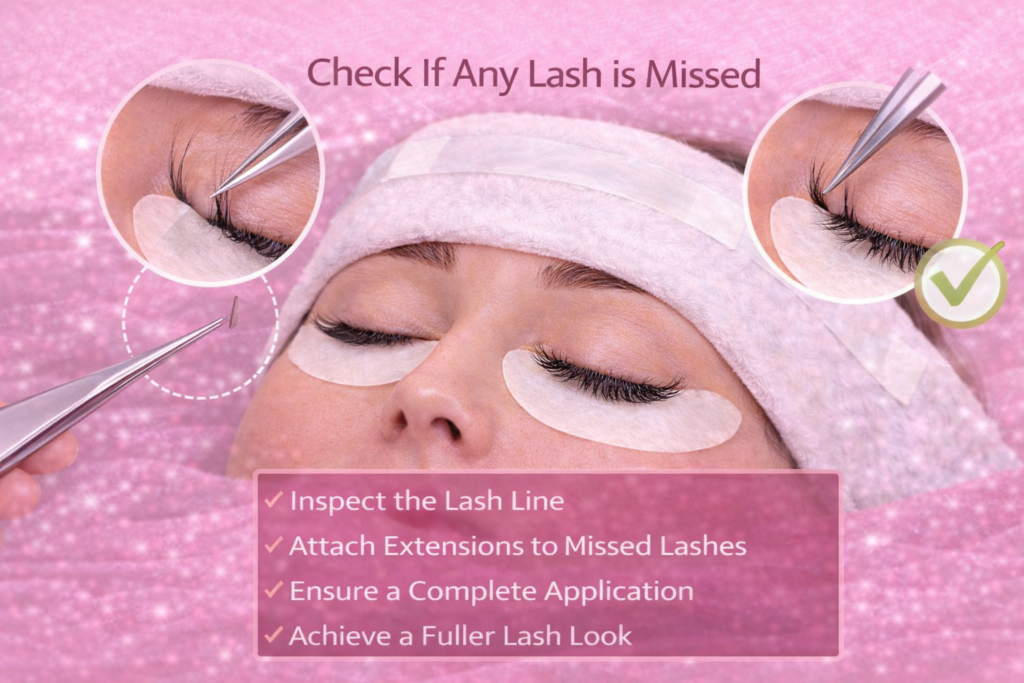
After checking for lash stickies, you should also inspect the lash line carefully to make sure no natural lash has been missed. Sometimes a lash can be skipped by accident during the application process, especially when working through many lashes one by one.
This step is important because missing too many lashes can make the final result look uneven and less full. It also matters for retention because natural lashes shed gradually as part of their normal growth cycle.
When some extensions start falling with the natural lashes over time, a fuller initial application helps the overall lash look remain visible for longer. For this reason, check the entire lash line closely and attach extensions to any suitable natural lashes that were missed.
The more complete the application is, the better and longer-lasting the final effect will be.
12. Remove the Under Eye Pads & Tap
Once you have confirmed that the adhesive has dried properly and all lashes are correctly applied, the next step is to remove the under-eye pads and tape. This step should be done gently so the client remains comfortable and the freshly applied extensions are not disturbed.
Start by carefully loosening the tape from the skin without pulling quickly. Then slowly lift the under-eye pads away from the lower lash line while making sure the lower lashes do not stick to the pad.
Move slowly because sudden movement can cause discomfort to the sensitive skin around the eyes. After removing the pads and tape, ask the client to open their eyes slowly. Finally, check the lashes once more to ensure everything looks clean, even, and properly placed.
13. Uncover the Forehead & Eyebrow
After removing the under-eye pads and tape, the next step is to uncover the client’s forehead and eyebrows. During the application process, this area is usually covered with a cloth to protect the skin and hair from accidental contact with adhesive or falling lash extensions.
Now you should carefully remove the tape that is holding the cloth in place. Peel the tape slowly so the client does not feel any discomfort. Once the tape is removed, gently lift the cloth away from the eyebrows and forehead.
Check the area to make sure the skin and eyebrows are clean and free from any adhesive residue. This final step helps complete the procedure and leaves the client comfortable and tidy after the lash application.
14. Open the Eyes
After completing all the application steps, ask the client to slowly open their eyes. Once the eyes are open, encourage the client to look at the results carefully in a mirror. This allows them to see how the eyelash extensions look and check the overall appearance.
You can use a traditional mirror, but an online mirror can sometimes be more helpful. A free online mirror often includes features such as zoom in, zoom out, and brightness adjustment. These features allow you and the client to observe the lashes more closely and notice small details that may not be easy to see in a normal mirror.
A careful final check ensures that the extensions look even, neat, and properly placed.
15. Follow the Proper Lash Extension Aftercare Routine
Following a proper lash extension aftercare routine is just as important as the application process itself. Good aftercare helps maintain the appearance of the lashes and allows the extensions to last longer without losing their shape or volume.
After the procedure, clients should follow recommended care practices to protect both the extensions and their natural lashes. Proper aftercare reduces the chances of premature shedding and keeps the lash set looking fresh for a longer period.
It also helps maintain comfort and supports healthy natural lash growth. For this reason, aftercare should never be ignored once the extensions are applied. If you want to understand each aftercare step in detail, read our complete guide on eyelash extension aftercare.
Enjoy The Benefits of Lash Extensions
When eyelash extensions are applied correctly and proper aftercare is followed, you can fully enjoy the benefits they offer. Well-applied lash extensions enhance the natural beauty of your eyes and give your lashes a fuller, longer, and more defined appearance.
They also reduce the need for daily eye makeup, which saves time in your beauty routine. In addition, high-quality lash extensions can provide a polished and elegant look that lasts for several weeks.
However, these benefits are best experienced when both application and aftercare are done properly. Want to learn more about the advantages? Read our detailed article on the benefits of eyelash extensions.
Conclusion
Applying eyelash extensions is a detailed process that requires patience, precision, and proper technique. Each step, from preparing the natural lashes to carefully attaching every extension, plays an important role in achieving a clean and balanced result.
When the procedure is performed correctly, eyelash extensions can enhance the eyes while still maintaining a natural appearance. It is also important to follow safety measures and avoid skipping small steps, because even minor mistakes can affect the final outcome.
By carefully selecting the right lash type, style, and application method, you can create long-lasting and comfortable results. Following this step-by-step approach helps ensure the extensions look neat, professional, and visually appealing.