
Published On: 06 September 2026
Want to apply gel nail polish at home but not sure where to start? Following the right steps can make the application process easier and more organized. In this article, we cover an easy and simple step-by-step guide to applying gel nail polish.
We start with the essential tools and products you will need, followed by filing and shaping your nails, buffing them, and carefully handling the cuticles. We also explain how to clean and dry your nails before applying the base coat.
Next, you will learn how to apply and cure the gel color coats and top coat, along with tips on avoiding washing immediately after application and moisturizing regularly. Finally, we explain the importance of proper gel nail polish removal and guide you toward our detailed removal article.
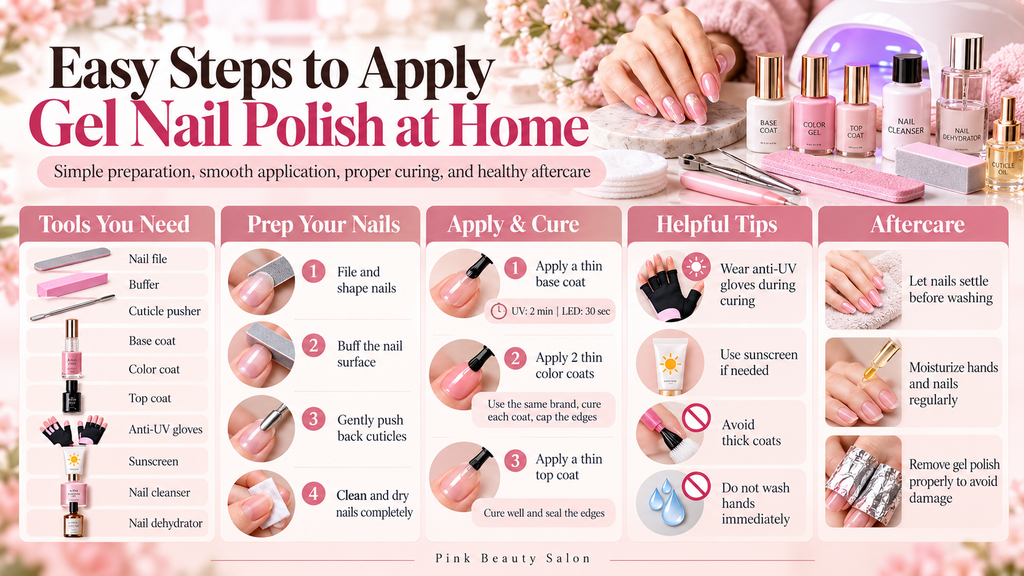
Things You Will Need to Apply Gel Nail Polish
If you are going to apply gel nail polish, make sure you have all of these essential items with you so that you do not face any inconvenience during the application process.
- Nail File
- Nail Buffer
- Cuticle Pusher
- Gel Polish Base Coat
- Gel Polish Color Coat
- Gel Polish Top Coat
- Anti-UV Gloves
- Sunscreen
- Nail Cleanser
- Nail Dehydrator
File & Shape Your Nails
The first step before applying gel nail polish is to properly file and shape your nails. This is important because shaping your nails after applying gel nail polish is not appropriate.
If you do not shape your nails properly beforehand, then no matter how well you apply the gel nail polish, your nails may not look as good as you want them to.
Therefore, it is important to carefully file your nails using a nail file and achieve the desired shape that you prefer for your nails.
Buff Your Nails
After filing and shaping your nails, it is important to buff them properly. Buffing your nails helps remove any old polish residue that may be left on the nail surface.
Not only that, but it also removes the unevenness and imperfections from the nail surface that can interfere with the proper application of gel nail polish. This helps the gel nail polish last longer.
Buffing your nails is very easy, and you can easily buff your nails by following these simple steps. If you want to learn professional-level nail buffing, read our article on how to buff nails.
Carefully Handle the Cuticle
After shaping and buffing your nails, you need to take care of your cuticles. The cuticle is the skin around your nails where the skin meets the nail surface.
Before applying gel nail polish, it is important to properly take care of your cuticles.
Push the cuticles back away from your nails so they do not create any obstruction during the gel nail polish application.
You can apply a cuticle softener to make the cuticles soft. Then, take a nail cuticle pusher and gently push the cuticles back from the nail surface.
However, you need to be very careful while doing this because the cuticle is very soft and delicate, so you should avoid causing any damage. You only need to gently push the cuticles back. Do not push them back more than necessary.
Clean & Dry Your Nails
After shaping and buffing your nails and pushing back the cuticles, it is very important to clean them properly. During these steps, dust and other particles can accumulate on your nails and around the nail area.
Removing them is essential; otherwise, your nails and the gel polish will not interact properly, and the polish may not attach correctly to the nail surface.
You can use a clean cloth to remove these particles from your nails. You can also use a nail cleanser if you have one, as it can be a better option. Before moving on to the next steps, make sure your nails are completely dry.
Gel nail polish does not attach properly to wet nails, so make sure your nails are not only clean but also completely dry.
Apply the Base Coat
Now comes the main step. First, you need to apply a base coat. A base coat is the layer that is applied directly to your nail surface.
Select a good-quality base coat, apply it to your nails, and then cure it. You can use either a UV or LED lamp to cure your base coat.
If you are using a UV lamp, place your nail under the UV lamp and let the base coat cure for at least 2 minutes. If you are using an LED lamp, you need to cure the gel base coat for at least 30 seconds.
However, remember to wear anti-UV gloves during the curing process so that the rays only reach your nails and do not affect the skin around your nails or your hands.
If you have sweaty fingers or hands, you can also use sunscreen to help protect your hands from exposure to the rays.
Apply the Gel Color Coats
After applying and curing the gel base coat, it is time to apply the gel color coats. One common mistake people make is using different brands for the base coat, color coat, and top coat.
You should avoid doing this. Whenever you apply gel nail polish, make sure your base coat, color coat, and top coat are from the same gel nail polish brand, as products from the same brand are more likely to work well together.
Another important thing to remember is to apply your gel color coat in thin layers. First, apply a small amount of gel color to your brush. Then, wipe the brush against the inside of the bottle to remove any excess product.
Make sure there is no extra product on the brush before applying it to your nail. Also, do not forget to cap the edge of your nail. This helps prevent the gel polish from wearing off quickly and helps it last longer.
Just as you cured the base coat, you also need to cure each gel color coat. You can use either a UV or LED lamp for curing.
Apply two thin coats of gel color. Apply the first coat, cure it, and wait for it to set. Then apply the second coat and cure it as well. After that, wait for it to set before moving on to the top coat.
Apply the Top Coat
Just as you applied the base coat and gel color coats, you also need to apply the top coat. Dip your brush into the top coat bottle and remove any excess product from the brush. Make sure only a thin layer remains on the brush before applying it to your nails.
After applying the top coat, cure it under a UV or LED lamp. If you are using a UV lamp, cure it for 2 minutes. If you are using an LED lamp, cure it for 30 seconds. Make sure the top coat is properly cured before moving on.
Also, do not forget to cap the edge of your nail with the top coat, as this will help increase the lasting time of your gel nail polish.
Avoid Washing
Many people make the mistake of washing their hands as soon as they complete the gel nail polish application. You should avoid doing this. Give your gel nail polish some time to settle and dry naturally. Once you feel that enough time has passed, you can wash your hands.
Otherwise, if you wash them too soon, the polish may start coming off quickly because fresh polish does not immediately form a strong bond. Washing too soon can increase the chances of the polish becoming damaged or coming off.
So, wait and allow your nails to dry without any disturbance. Once the gel polish has properly set and enough time has passed, you can wash your hands.
Moisturize Regularly
This is not a direct step in the gel nail polish application process, but it helps your gel polish last longer and plays an important role in proper nail care.
You should moisturize your hands regularly and keep your nails moisturized. You can use a moisturizer, or nail serum for this purpose.
If you make this a regular part of your routine, your polish will not come off quickly, and your nails will also remain healthy, clean, and strong.
How to Remove Gel Nail Polish
Removing gel nail polish is just as important as applying it properly. Just as you need to follow the correct steps when applying gel nail polish, you also need to follow different steps for removing it safely and properly.
You can learn how to remove gel nail polish by reading our detailed article on how to remove gel nail polish.
Conclusion
Applying gel nail polish involves several important steps, from preparing your nails to applying and curing each coat properly. In this guide, we covered the essential items you need, how to file and shape your nails, buff the nail surface, and carefully handle your cuticles.
We also explained how to clean and dry your nails before applying the base coat, gel color coats, and top coat.
Along with the application process, we covered avoiding washing immediately afterward and moisturizing regularly as part of proper nail care.
Finally, we discussed the importance of removing gel nail polish properly and directed you to our detailed article for the removal process.