Published On: 15 Jan 2026
Want to do leg waxing but feeling confused because there are so many different options? Wondering which wax type to choose and what steps to follow? Not finding clear guidance anywhere? Don’t worry—I’ve got you.
If you want to wax your legs at home, I’ll walk you through every method step by step. Whether you’re using soft wax, hard wax, waxing strips, or sugar wax, I’ll explain each technique in detail.
From how to apply the wax properly to how to remove it safely and effectively, everything will be covered clearly so you can wax with confidence. So, let’s get started.
Set Up an Online Mirror Before You Start Leg Waxing
If you’re planning to wax your legs at home, it’s a smart idea to set up an online mirror in front of you before you begin. Using a traditional bathroom mirror isn’t always practical—it’s often large, fixed in place, and doesn’t offer the flexibility you actually need during waxing. When you’re working carefully, proper brightness and the ability to zoom in on small details really matter.
An online mirror allows you to clearly see each section of your legs, helping you check hair direction, wax application, and removal technique more accurately. You can zoom in to examine missed hairs and even capture images if needed for better positioning.
There’s no need to stress—tools like the Pink Beauty Salon online mirror offer helpful built-in features designed for grooming tasks, while also respecting your privacy and not storing personal data.
What Do You Wear During a Full Leg Wax
What you wear to a full leg wax might seem like a small detail—but it can completely shape how comfortable you feel during and after your appointment. I always recommend choosing loose, breathable pieces like a maxi dress, flowy skirt, relaxed sweatpants, or soft cotton shorts.
These options give your esthetician easy access during the session and, more importantly, give your freshly waxed skin the space it needs to breathe afterward. Tight jeans or leggings can create friction, trap heat, and irritate sensitive follicles.
But clothing isn’t the only thing that matters. Proper preparation before your leg waxing makes a real difference. We’ve covered everything—what to wear, what to avoid, and how to prep your skin—in our detailed leg waxing preparation guide.
How to Wax Legs With Hard Wax
Let’s walk through the proper steps for doing leg waxing with hard wax—but first, it’s important to understand something clearly. Yes, you can use hard wax for leg waxing, but it’s not always the most practical choice.
Hard wax is generally more suitable for smaller, sensitive areas like the Brazilian, bikini line, underarms, or face. Legs, on the other hand, cover a much larger surface area and are typically less sensitive, which is why soft wax is often preferred for efficiency and speed.
Still, if you prefer to use hard wax for your legs, here are the detailed steps to help you do it correctly and safely.
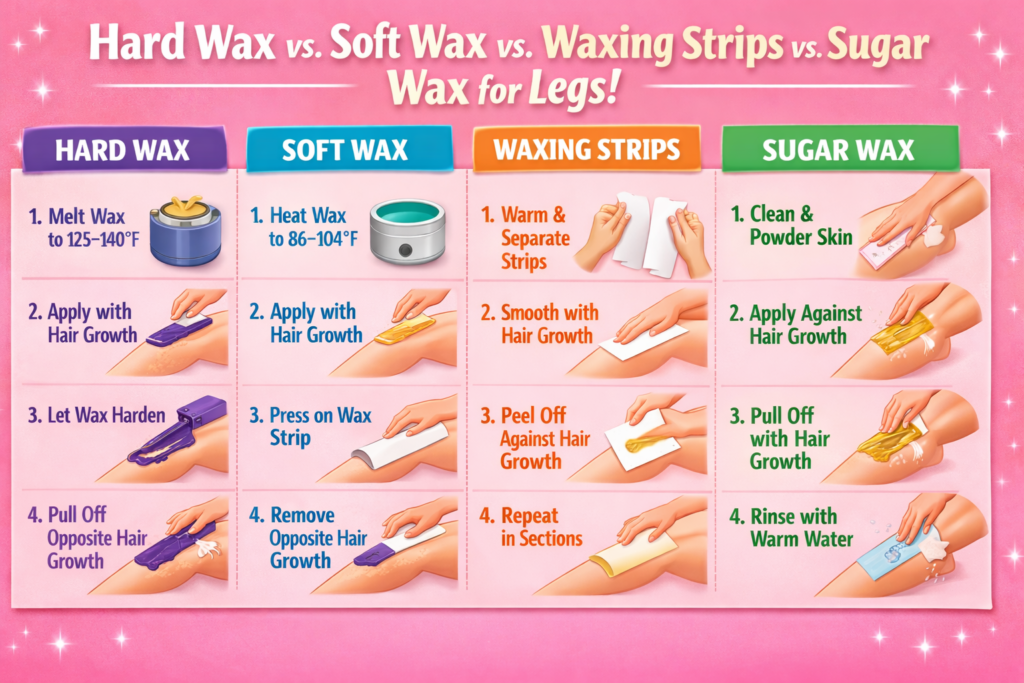
1. Heat the Hard Wax Properly
Melt the hard wax slowly until it reaches a thick, honey-like consistency, typically between 125–140°F (50–60°C). Hard wax temp should be 125–140°F (50–60°C) because at this temperature, the wax spreads smoothly without burning the skin or becoming too runny. Always test a small amount on your wrist before applying it to your legs.
2. Apply the Hard Wax In the Hair Growth Direction
Using a clean applicator, spread the wax in the direction of leg hair growth in a thin, even layer. This allows the hard wax to wrap firmly around each hair at the root for stronger grip and cleaner removal. Leave a small lip at the end of the strip to make pulling easier.
3. Allow the Hard Wax to Set
Let the wax harden naturally until it feels firm but still slightly flexible to the touch. The surface should look matte rather than glossy, which signals it has properly set. Removing it at the right stage helps prevent hair breakage and uneven results.
4. Remove the Hard Wax Correctly
Hold the skin taut with one hand and pull the wax off quickly in the opposite direction of hair growth, keeping your motion close and parallel to the skin. Research shows that pulling parallel minimizes skin trauma and reduces discomfort. Work in sections until the legs are completely smooth.
How to Wax Legs With Soft Wax
Now here comes one of the most suitable options for leg waxing—soft wax. You can absolutely wax your legs using soft wax, and in fact, soft wax is especially well-suited for large areas like the legs, back, and front of the body.
Because it spreads thinly and works quickly over bigger sections, it makes the process more efficient and practical. So, let’s go step by step and learn how to use soft wax properly for leg waxing to achieve smooth, effective results.
1. Heat the Soft Wax to the Right Consistency
Warm the soft wax until it reaches a smooth, honey-like texture—usually between 86–104°F. At this range, the wax spreads thinly and grips leg hair effectively without increasing burn risk. Always stir well and test a small amount on your wrist before applying.
2. Apply the Soft Wax in the Direction of Hair Growth
Using a clean applicator held at a 45-degree angle, spread a thin, paper-like layer of wax in the direction your leg hair naturally grows. Soft wax works best when applied thinly, allowing it to adhere to both hair and the skin surface for efficient removal. Keep the skin gently taut as you apply.
3. Place and Secure the Waxing Strip
Immediately press a cloth or paper strip over the wax while it is still tacky, smoothing it firmly in the same direction of application. Proper pressure ensures the strip bonds evenly to the wax and captures hair from the root. Leave a small tab at the end for easy grip.
4. Remove the Soft Wax Against the Hair Growth Direction
Hold the skin tight with one hand, then pull the strip back quickly in the opposite direction of hair growth, keeping your motion parallel to the skin. Dermatology guidance shows that pulling close to the skin reduces trauma and minimizes bruising. Work in sections to cover the entire leg evenly.
5. Remove Any Soft Wax Residue Gently
Since soft wax is oil-soluble, use a small amount of oil to dissolve leftover residue instead of scrubbing. Oil breaks down wax without irritating freshly treated skin, which is especially important because waxing temporarily sensitizes the skin barrier. Wipe gently and continue section by section.
How to Wax Legs With Waxing Strips
Yes, you can absolutely use pre-made waxing strips for leg waxing as well. They’re convenient, mess-free, and especially helpful if you want a quicker at-home option without heating wax. Pre-waxed strips are designed to work efficiently on larger areas like the legs, making them a practical choice for beginners and busy routines alike.
Now, let’s go step by step and learn how to wax your legs properly using ready-made waxing strips for smooth, even results.
1. Warm the Waxing Strips Properly
Rub the waxing strip between your palms for about 20–30 seconds to gently warm the wax. Body heat softens the wax just enough to improve adhesion without overheating it. Proper warming helps the strip grip leg hair more effectively.
2. Separate the Waxing Strips Carefully
Slowly peel the strip into two equal pieces, keeping the wax evenly distributed on both sides. Avoid touching the wax surface too much, as oils from your fingers can reduce its grip. Handle the strip by the edges for best results.
3. Apply Waxing Strips in the Direction of Hair Growth
Place the strip onto your leg in the direction of hair growth and smooth it down firmly with your hand 2–3 times. Applying with the grain helps the wax bind to the hair shaft properly. Keep the skin slightly taut as you press.
4. Remove Waxing Strips Against Hair Growth
Hold your skin tight, then quickly pull the strip back in the opposite direction of hair growth, keeping your motion low and parallel to the skin. Research shows that pulling close to the skin reduces irritation and bruising. Remove in one swift movement for cleaner results.
5. Repeat in Sections
Work in small sections across the leg rather than placing strips randomly. Overlapping slightly is fine, but avoid rewaxing the exact same spot repeatedly to minimize irritation. Move methodically until the legs feel smooth and even.
How to Wax Legs With Sugar Wax
Yes, sugar wax is also one of the most suitable options for leg waxing. It can be prepared at home using natural ingredients like sugar, lemon, and water, which makes it a popular choice for those who prefer a more natural approach. Many people also find sugar waxing less painful compared to other waxing methods because it adheres more to the hair than the skin.
So, let’s learn the step-by-step process to wax your legs properly using sugar wax for smooth and comfortable results.
1. Clean Your Legs Thoroughly
Start by washing your legs with a gentle cleanser and drying them completely before applying sugar wax. The American Academy of Dermatology notes that hair removal works best on clean, oil-free skin because residue can block proper adhesion. Clean skin allows the sugar paste to grip hair more effectively and remove it more evenly.
2. Apply a Light Layer of Powder
Dust a small amount of cornstarch or unscented powder over your legs to absorb excess moisture. This creates a light barrier so the sugar wax clings to hair rather than sticking too firmly to the skin. Keeping the skin dry improves control and reduces unnecessary irritation.
3. Apply the Sugar Wax Against Hair Growth
Take a small portion of sugar paste, roll it into a ball, and press it onto the leg in small sections. Smooth it firmly against the direction of hair growth so it wraps securely around the hair shaft. Working in smaller areas gives you better precision and cleaner results.
4. Remove Immediately in the Direction of Hair Growth
Unlike hard wax, sugar wax is removed right away—there is no waiting time. Hold the skin taut and flick or pull the paste off in the same direction as hair growth, keeping your motion close to the skin. This technique reduces breakage and is known to cause less irritation.
5. Rinse the Area With Warm Water
Since sugar wax is water-soluble, simply rinse your legs with warm water to remove any leftover residue. There’s no need for oils or special removers, which makes cleanup gentle and simple. Pat dry softly to keep freshly waxed skin calm and comfortable.
When Waxing Legs Which Direction to Follow
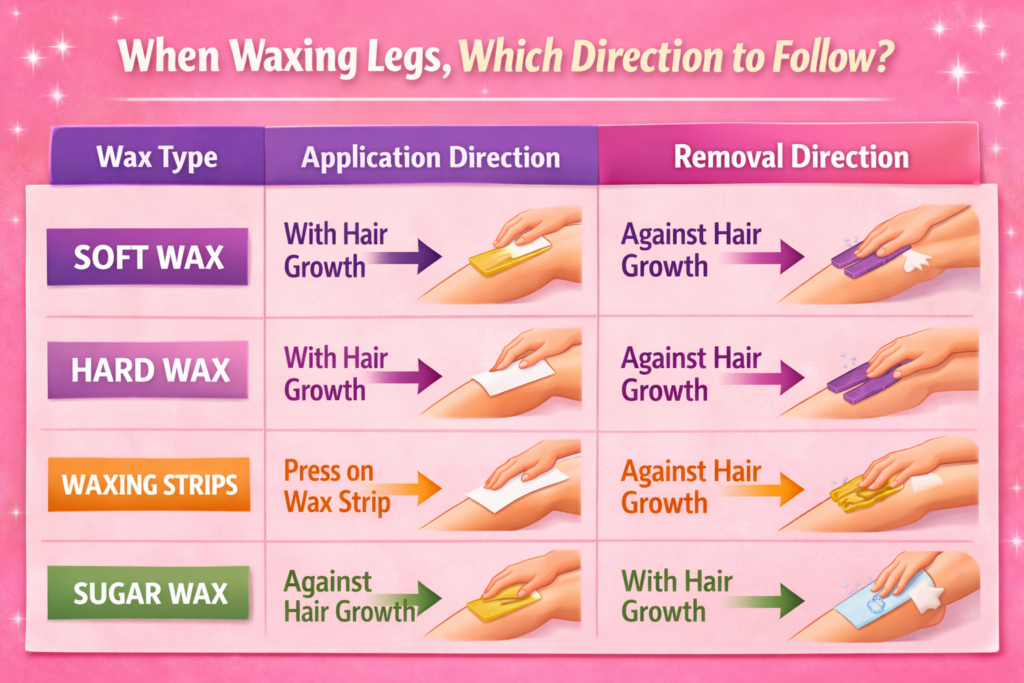
When waxing your legs, the direction you follow depends on the type of wax you’re using—and getting this right makes a noticeable difference in how clean and comfortable the removal feels.
With soft wax, you apply the wax in the direction of hair growth and remove it quickly in the opposite direction.
The same rule applies to hard wax—spread it in the direction of hair growth, then pull it off against the growth for effective root removal.
Waxing strips follow this pattern as well: smooth them down with hair growth and remove against it.
Sugar wax, however, works differently—you apply it against hair growth and remove it in the natural direction of hair growth to reduce breakage and irritation.
Leg Waxing Aftercare Matters a Lot
Leg waxing doesn’t end once the hair is removed—aftercare plays an equally important role in protecting your skin and maintaining smooth results. Freshly waxed skin is more sensitive, with open follicles that need time to calm and recover properly.
The right aftercare routine helps reduce redness, prevent ingrown hairs, and minimize irritation. To guide you step by step, we’ve written a detailed article dedicated entirely to leg waxing aftercare. Make sure to read it to keep your skin healthy, balanced, and beautifully smooth.
Conclusion
Waxing your legs at home becomes much easier when you understand how each method truly works. Hard wax, soft wax, waxing strips, and sugar wax all follow different application and removal techniques, and those directional rules directly affect your comfort and results.
Paying attention to temperature, sectioning, and removal motion helps reduce irritation and improve hair removal efficiency. Just as important, knowing what to wear and how to prepare sets the stage for a smoother experience overall.
With the right knowledge and careful technique, at-home leg waxing can deliver professional-level smoothness while keeping your skin healthy, calm, and confidently cared for.