Published On: 03 Feb 2026
If you’ve ever wanted a natural, affordable, and skin-friendly way to remove hair, sugar wax might just be your new favorite solution. Loved for centuries and still popular today, sugar waxing is simple, effective, and surprisingly easy to make at home. The best part? You only need a few basic kitchen ingredients—no fancy tools required! 😊
In this sugar wax recipe guide, we’ll walk you through how to make sugar wax at home, explain the right ingredient ratios, ideal temperature, color cues, and even common mistakes to avoid. Whether you’re a beginner or just looking to perfect your technique, this guide has you covered. Ready to make smooth skin the natural way? Let’s get started! ✨
What is Sugar Wax
Sugar wax is a natural hair removal method made primarily from sugar, water, and lemon juice or other natural acids. It works by sticking to the hair rather than the skin, which helps remove hair from the root while causing less irritation.
Sugar wax has been used for centuries and is especially popular because it’s gentle, affordable, and suitable for sensitive skin. It can be used on different body areas and is easy to clean with water. We’ve covered the complete sugar wax guide in a separate article, where you can explore it in detail.
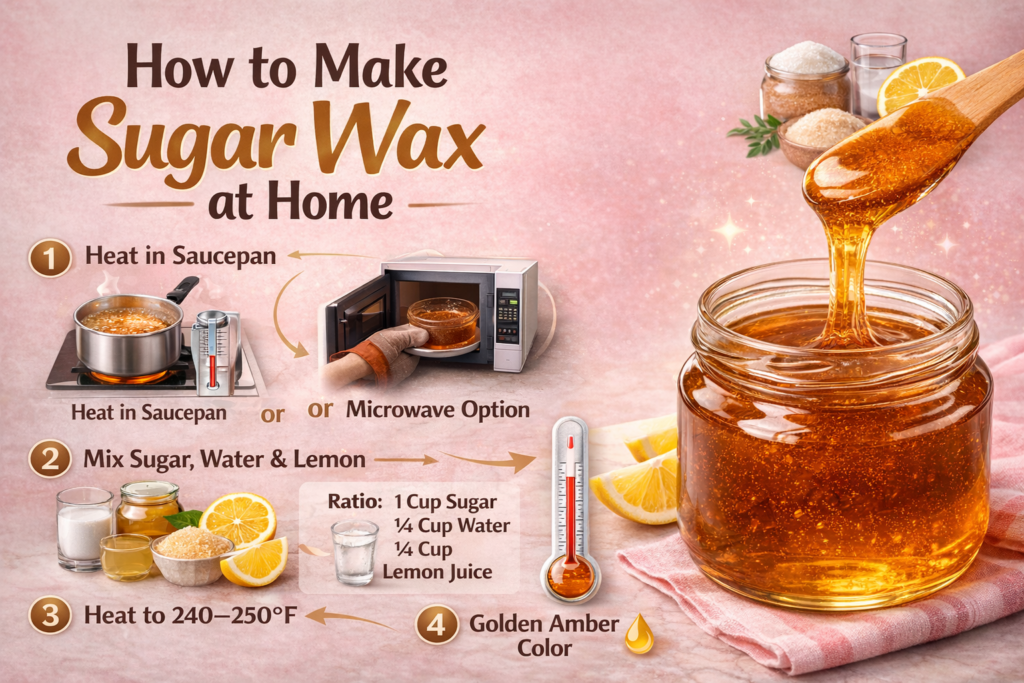
Steps to Make Sugar Wax at Home: Sugar Wax at Home Recipe
1. Place the SaucePan on the Stove

To heat the sugar wax ingredients, you need a saucepan, which is placed on the stove. And hey—this part is really important! Always use a deep saucepan. Why? Because while heating and constantly stirring, the ingredients can bubble up and spill out. Ugh… that can be messy and a little frustrating, right?
Due to the heat, the mixture may also overflow, and nobody wants to deal with that surprise! 😲 So using a deep saucepan helps prevent spills and keeps everything under control. Honestly, it just makes the whole process smoother and stress-free. Ahh… much better! 😊
And tell me—why risk a mess when a deeper pan can make things so much easier?
2. Add the Sugar Wax Ingredients in Precise Ratio
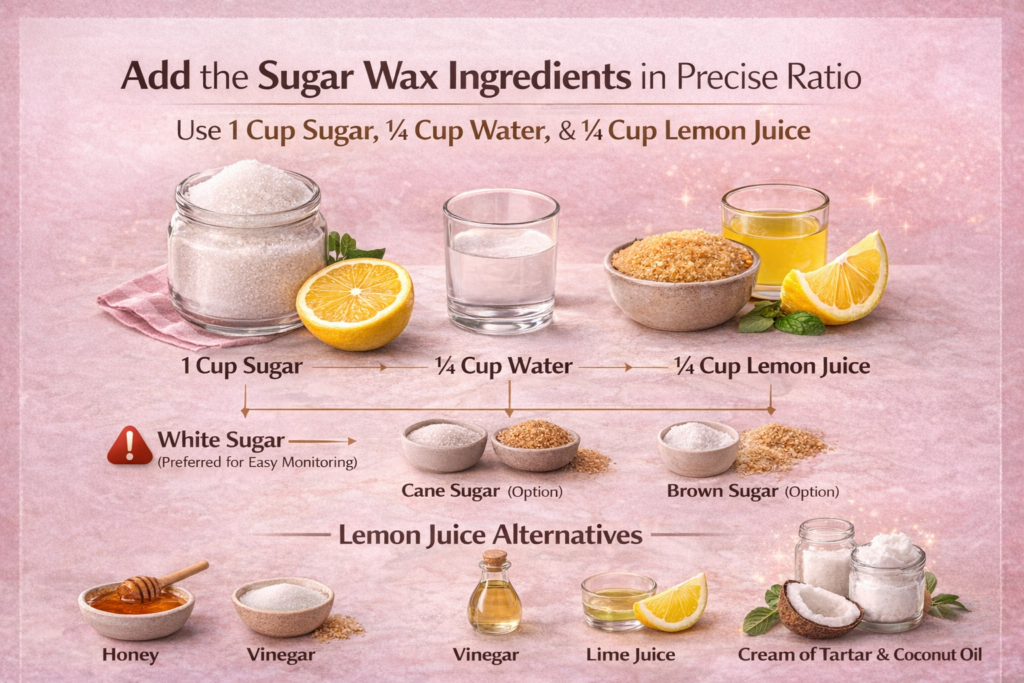
Once the saucepan is warmed on the stove, the next step is adding the sugar wax ingredients. Now you might wonder—what are the sugar wax ingredients? That is simple: standard sugar wax is made using three basic ingredients—sugar, water, and lemon juice.
So, what kind of sugar is used to make sugar wax? To make sugar wax, you can use white granulated sugar, which is most commonly preferred because its light color makes it easier to monitor the mixture as it cooks. Brown sugar can also be used, and some experts even suggest cane sugar to make sugar wax. Honestly, the choice is yours—it depends on what you have at home and what works best for you.
The next question people often ask is, what is the correct ratio to make sugar wax? The ideal and widely recommended ratio to make sugar wax is 1 cup of sugar, ¼ cup of water, and ¼ cup of lemon juice. Following this precise proportion helps you achieve that perfect sticky, pliable texture—no guesswork, no surprises!
Now let’s talk about an important question: why is lemon juice used in sugar wax? Lemon juice prevents the mixture from crystallizing into hard candy and helps maintain a smooth, gooey consistency. Plus—here’s a happy bonus! 🍋 Research shows that lemon contains d-limonene, a powerful antioxidant with cleansing and purifying properties that are beneficial for the skin. Sounds great, right?
But what if you’re thinking, can you make sugar wax without lemon? Yes, you absolutely can! If you want to skip lemon juice to make sugar wax, you may either leave it out entirely or replace it with an alternative. Can honey be used instead of lemon? Yes—honey works well as a substitute of lemon to make sugar wax. Vinegar is another effective alternative of lemon juice in sugar wax, and so is lime juice, since lime also contains citric acid similar to lemon. And if you don’t even want to use vinegar and lime then you can use cream of tartar or add a bit of coconut oil as a lemon juice & lime alternative to adjust texture and skin feel.
You might also ask, can sugar wax be made with just sugar and water? Technically, yes—but without an acidic ingredient like lemon, lime, or vinegar, the mixture is more likely to harden and crystallize. So while it’s possible, adding an acid makes the process easier and the results much better.
See? Once you understand the ingredients, sugar waxing feels far less confusing—and honestly, kind of satisfying! 😊
3. Stir Until the Required Temperature is Achieved
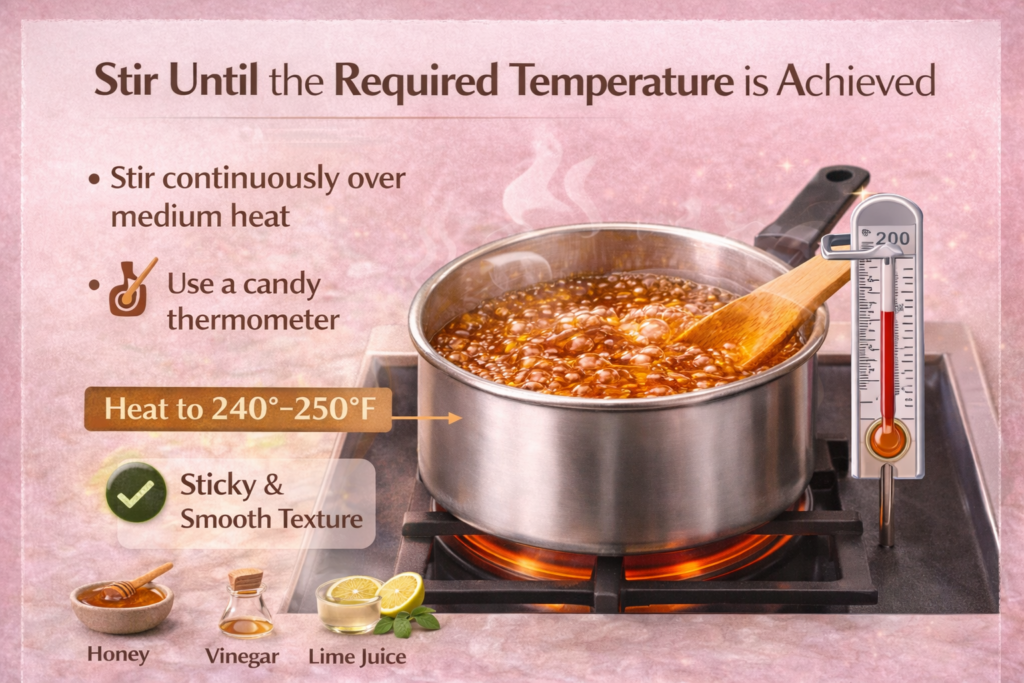
Now that the saucepan is on the stove and all the ingredients are inside, the real game begins—achieving the perfect sugar wax consistency. This part needs a little patience, but don’t worry, you’ve got this! 😊
Start heating the mixture over medium heat and stir it continuously. Constant stirring is important because it keeps the bubbles from becoming too aggressive—no sudden splashing or scary boil-overs, please! 😬 Slow and steady stirring really makes a difference here.
To be precise (and yes, precision matters!), use a candy thermometer to monitor the temperature of the mixture. Keep heating and stirring until the temperature reaches around 240°F to 250°F. This temperature range is considered ideal for creating sugar wax with the right texture—sticky, smooth, and easy to work with.
This step usually takes about 10–15 minutes, so don’t rush it. Keep stirring, keep watching the thermometer, and ask yourself—is the texture starting to look glossy and smooth yet? That’s a good sign! 😊.
Once you hit the right temperature, you’re just one step away from perfect sugar wax. Ahh… so satisfying, right?
4. Observe the Color of the Sugar Paste
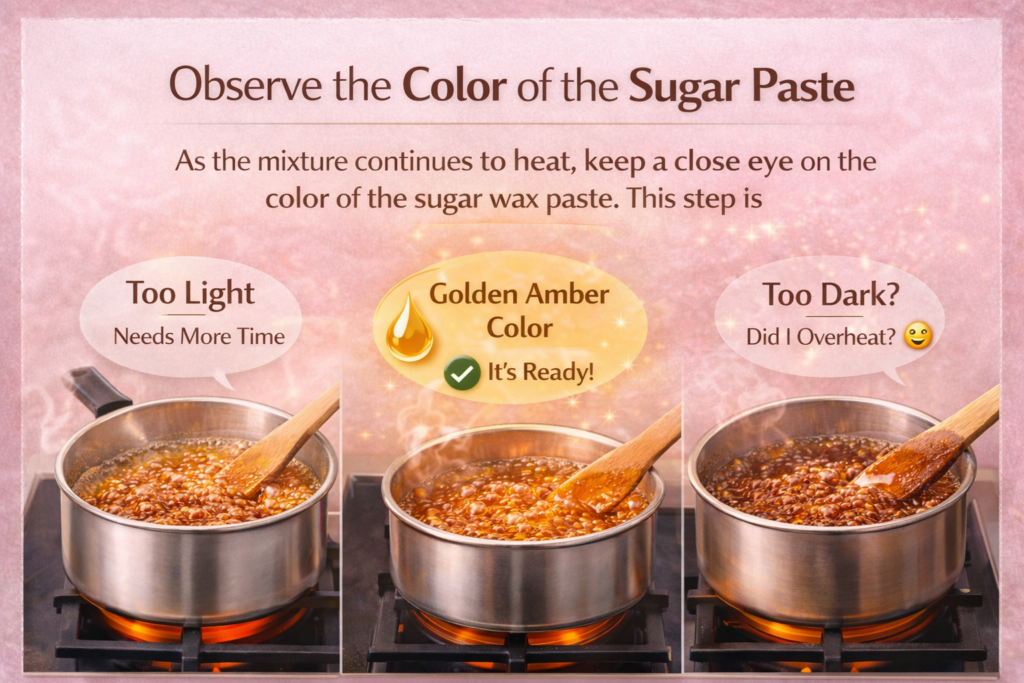
As the mixture continues to heat, keep a close eye on the color of the sugar wax paste. This step is just as important as checking the temperature!
Once the color changes to a golden amber or a golden-brown shade, it’s a clear sign that the sugar wax is ready. That warm, golden tone? Oh yes—that’s exactly what you’re looking for! ✨
If the mixture is still too light, it needs more time. But if it starts getting too dark, you might think, uh-oh, did I heat it for too long? 😬 So stay alert and trust your eyes—sometimes they tell you more than the thermometer.
When you see that perfect golden-brown color, you’ll know… this is it!
5. Remove the Saucepan from the Stove
Once the sugar wax reaches the right color and consistency, remove the saucepan from the stove immediately. At this stage, the wax is extremely hot, so patience is key here!
Allow the sugar wax to cool down slightly before applying it to the skin. This cooling step is very important to prevent burns—because let’s be honest, nobody wants that painful surprise! 😖
Before use, ask yourself: Is it warm enough to spread, but cool enough to touch safely? If yes, you’re good to go 😊.
Can You Make Sugar Wax in the Microwave
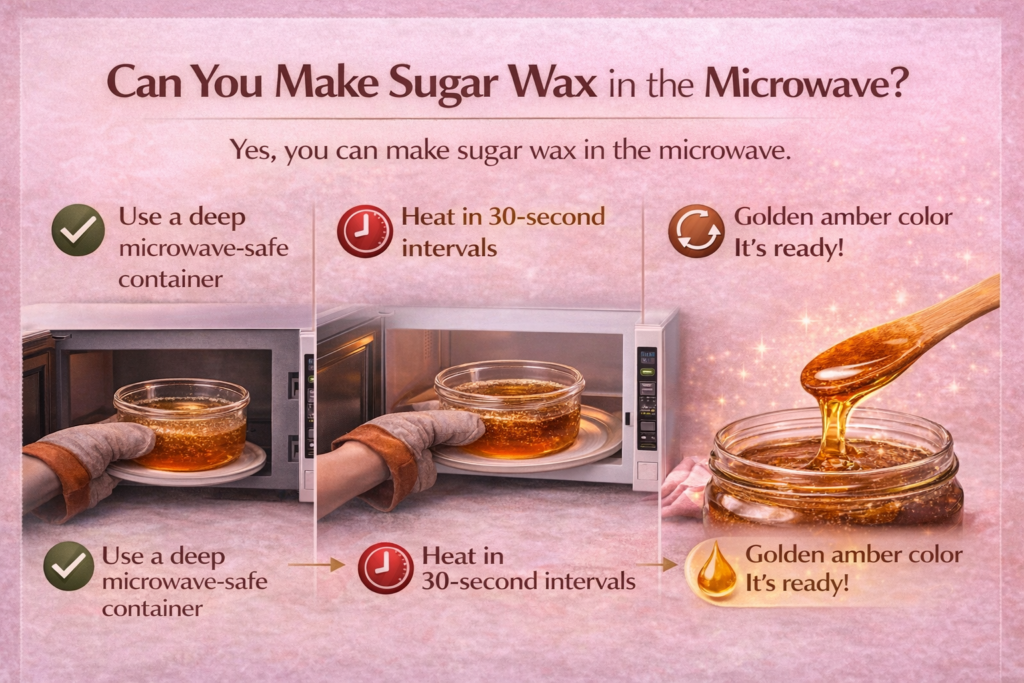
Yes, you can make sugar wax in the microwave.
To make sugar wax in the microwave, take a microwave-friendly container and add all the sugar wax ingredients to it. Make sure the container is deep enough so the mixture doesn’t overflow while heating—trust me, that can get messy fast! 😬
Heat the mixture for 2–3 minutes, but don’t set the time all at once. Instead, microwave it in 30-second intervals. After every 30 seconds, carefully take the container out, stir the mixture well, then put it back in the microwave. Repeat this process until the mixture turns a golden brown or golden amber color. Once you see that color, your sugar wax is ready!
How to Use Sugar Wax
Now you can use the sugar wax, but remember—this step also requires careful guidance and proper technique. Applying sugar wax correctly makes a big difference in both comfort and results.
If you’re unsure about the application process, don’t worry! We’ve already covered this in detail in a separate article on how to use sugar wax. You can read that guide to gain helpful insights and feel more confident before starting.
After all, why rush when a little guidance can make the experience smoother and much more effective?
How to Store the Sugar Wax for Future Use
If you want to store the sugar wax for later use, you absolutely can. Proper storage helps maintain its texture and effectiveness, so it’s worth doing it the right way.
To make things easier, we’ve already covered this topic in detail in a dedicated article on how to store sugar wax. Give it a read to learn the best practices and avoid any common mistakes.
Because honestly—why let good sugar wax go to waste? 😊
What Are the Common Mistakes When Making Sugar Wax?
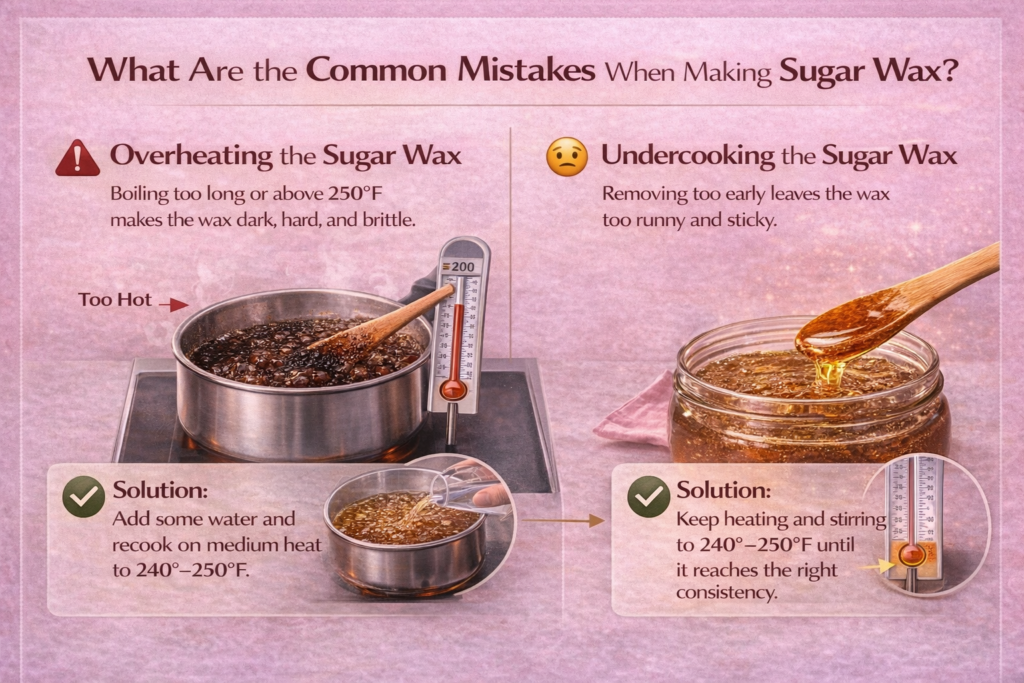
1. Overheating the Sugar Wax
Overheating is one of the most common mistakes when making sugar wax. When the mixture is boiled for too long or heated beyond the recommended temperature, it becomes hard, brittle, and dark in color. Instead of spreading smoothly, it hardens quickly and becomes impossible to work with—ugh, so frustrating! 😣 This usually happens when the heat is too high or the thermometer isn’t monitored closely.
Solution: Add some water and recook on medium heat, stir continuously, and remove the wax once it reaches 240–250°F.
2. Undercooking the Sugar Wax
Undercooking the sugar wax can be just as problematic. When the mixture isn’t heated enough, it stays too runny, overly sticky, and syrup-like. Instead of gripping hair properly, it spreads everywhere and creates a messy application—definitely not the result you want 😬. This usually happens when the mixture is removed too early or the temperature isn’t checked.
Solution: Be patient. Keep stirring and heating until the wax reaches the correct temperature and golden-brown color, ensuring the right consistency.
Why Did My Sugar Wax Get Rock Solid
Sugar wax usually becomes rock solid because it was overheated or cooked for too long. When the temperature goes beyond the ideal range, too much moisture evaporates, causing the sugar to harden like candy.
This can also happen if the heat is too high or the mixture isn’t removed at the right time. The result is a brittle wax that’s impossible to spread. To fix this, gently reheat the wax and add a small amount of water or lemon juice to restore flexibility.
Can You Overcook Sugar Wax
No, you should not overcook sugar wax.
When sugar wax is heated for too long or cooked at a temperature higher than recommended, it loses too much moisture and turns hard and brittle. Instead of staying smooth and pliable, it begins to behave like hard candy, making it difficult—or impossible—to spread on the skin.
Overcooking often happens when the heat is too high or the mixture isn’t stirred and monitored closely. Using a candy thermometer, cooking on medium heat, and removing the wax at around 240–250°F helps prevent this issue and ensures the wax remains flexible and easy to use.
Conclusion
Making sugar wax at home is a simple and rewarding process when done correctly. With the right ingredients, precise ratios, proper temperature control, and a little patience, you can create an effective and skin-friendly hair removal solution right in your kitchen.
From understanding the importance of color and consistency to avoiding common mistakes like overheating or undercooking, each step plays a key role in achieving the perfect wax. Whether you choose the stovetop or microwave method, sugar waxing offers a natural, affordable alternative to commercial products. With practice and care, you’ll be able to enjoy smooth, long-lasting results confidently at home.